How to create a website?
Steps of building
STEP-1 : Installing all the necessary tools.
STEP-1 : Installing all the necessary tools.
STEP-2 : Open repository into GitHub.
STEP-3 : Publish the page from GitHub.
STEP-4 : Clone the repository into GitHub Desktop.
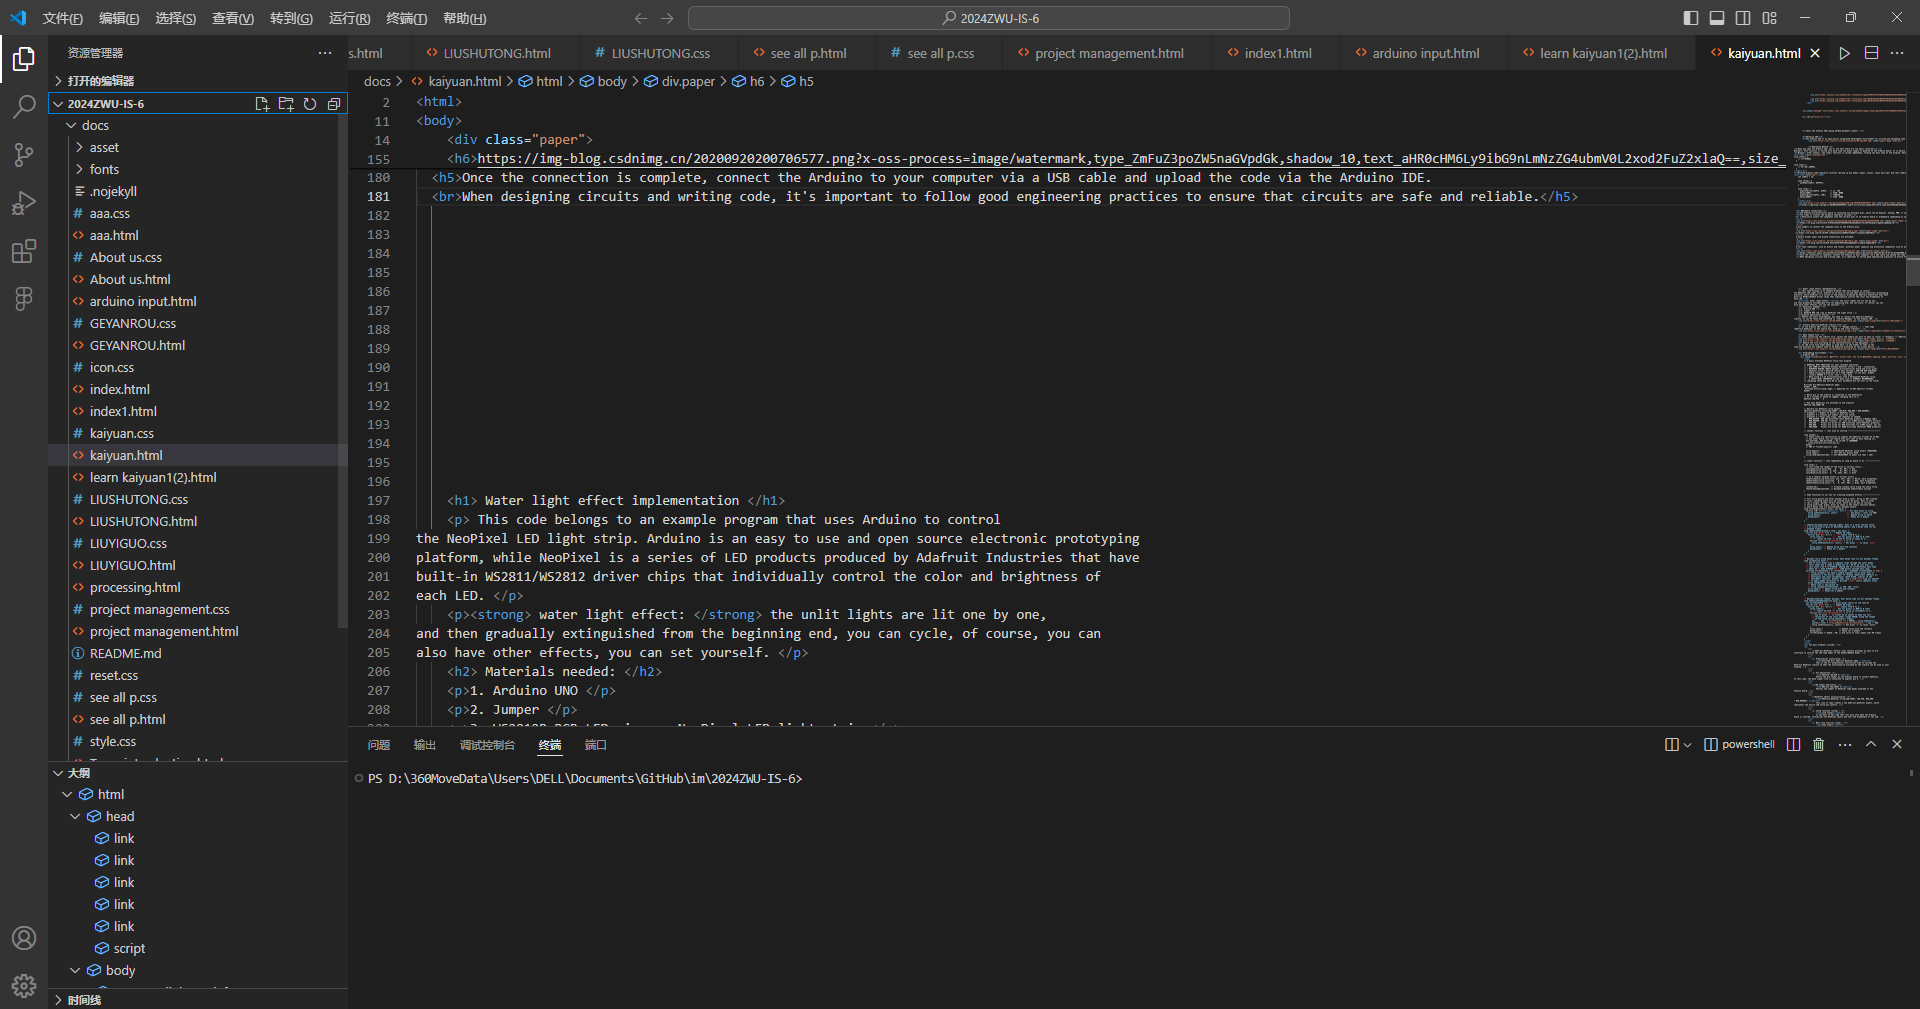
STEP-5 : Open the repository into Visual Studio Code and write the code.
STEP-6 : Install Docsify from terminal.
STEP-7 : Code writing.
STEP-8 : Push all the changes into origin.
STEP 1 : Installing necessary Tools
We installed all the following tools to build the website - Git; It serves as a control system for tracking changes to the code base, collaborating, managing project versions, which allows us to clone, commit, and push changes to GitHub. check it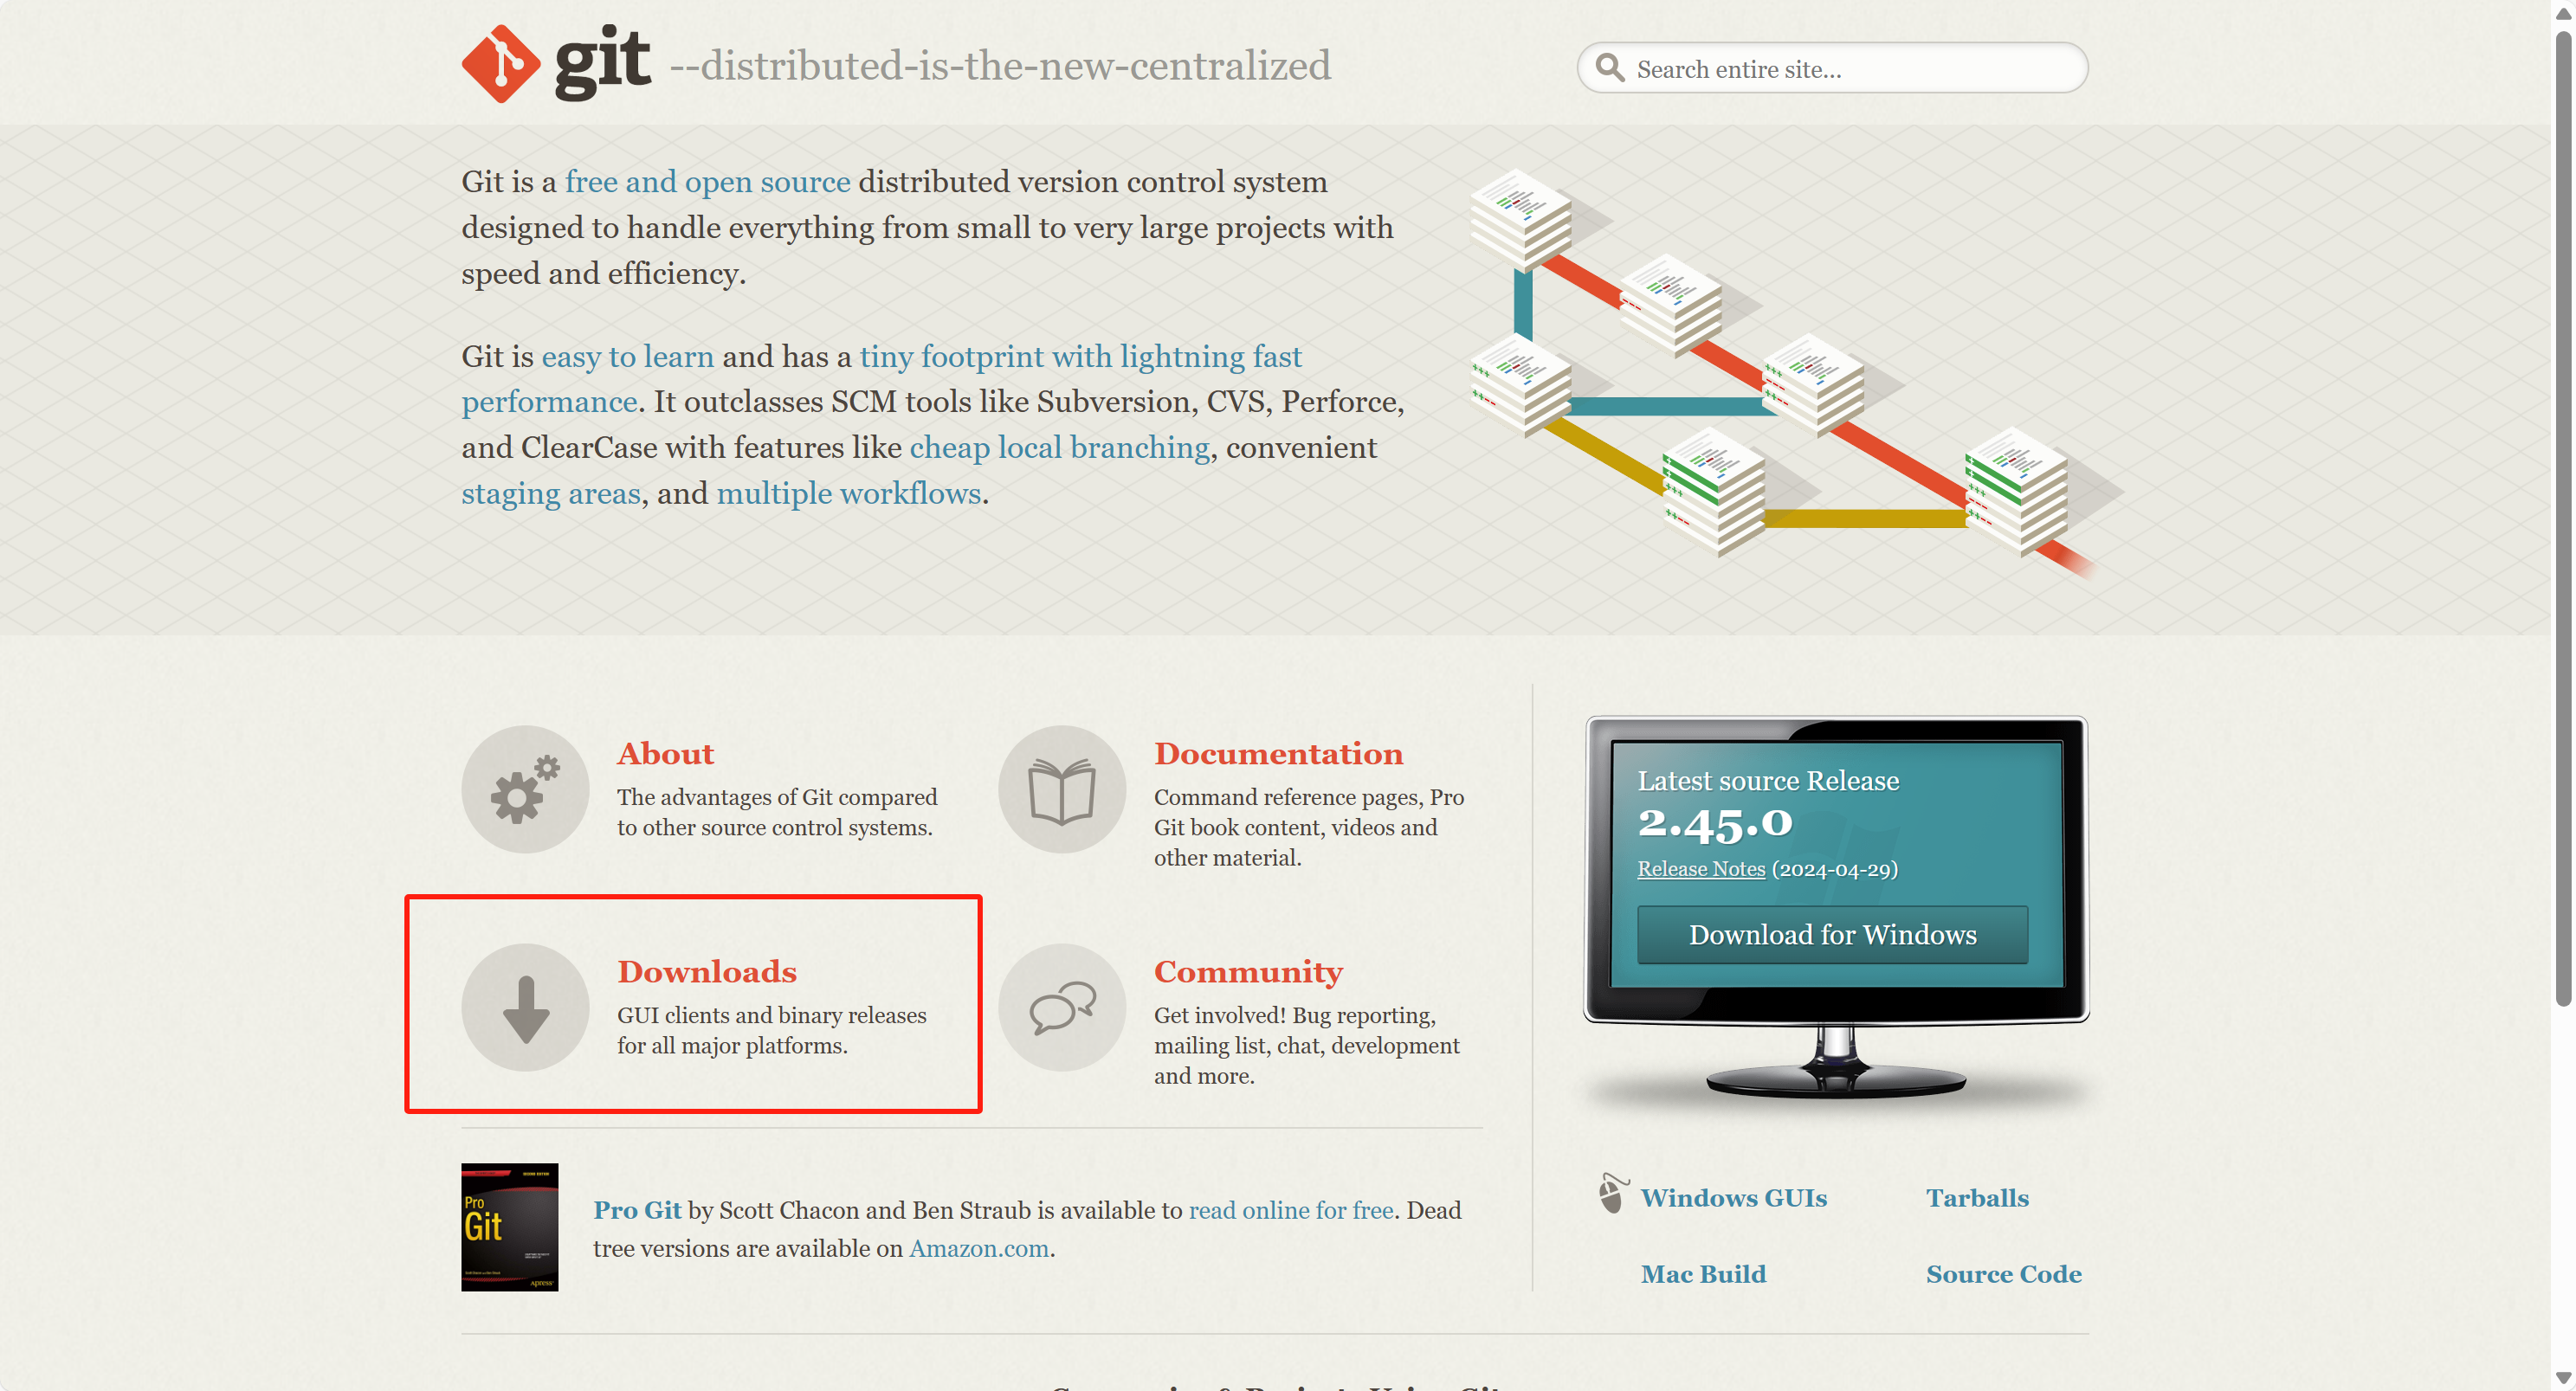
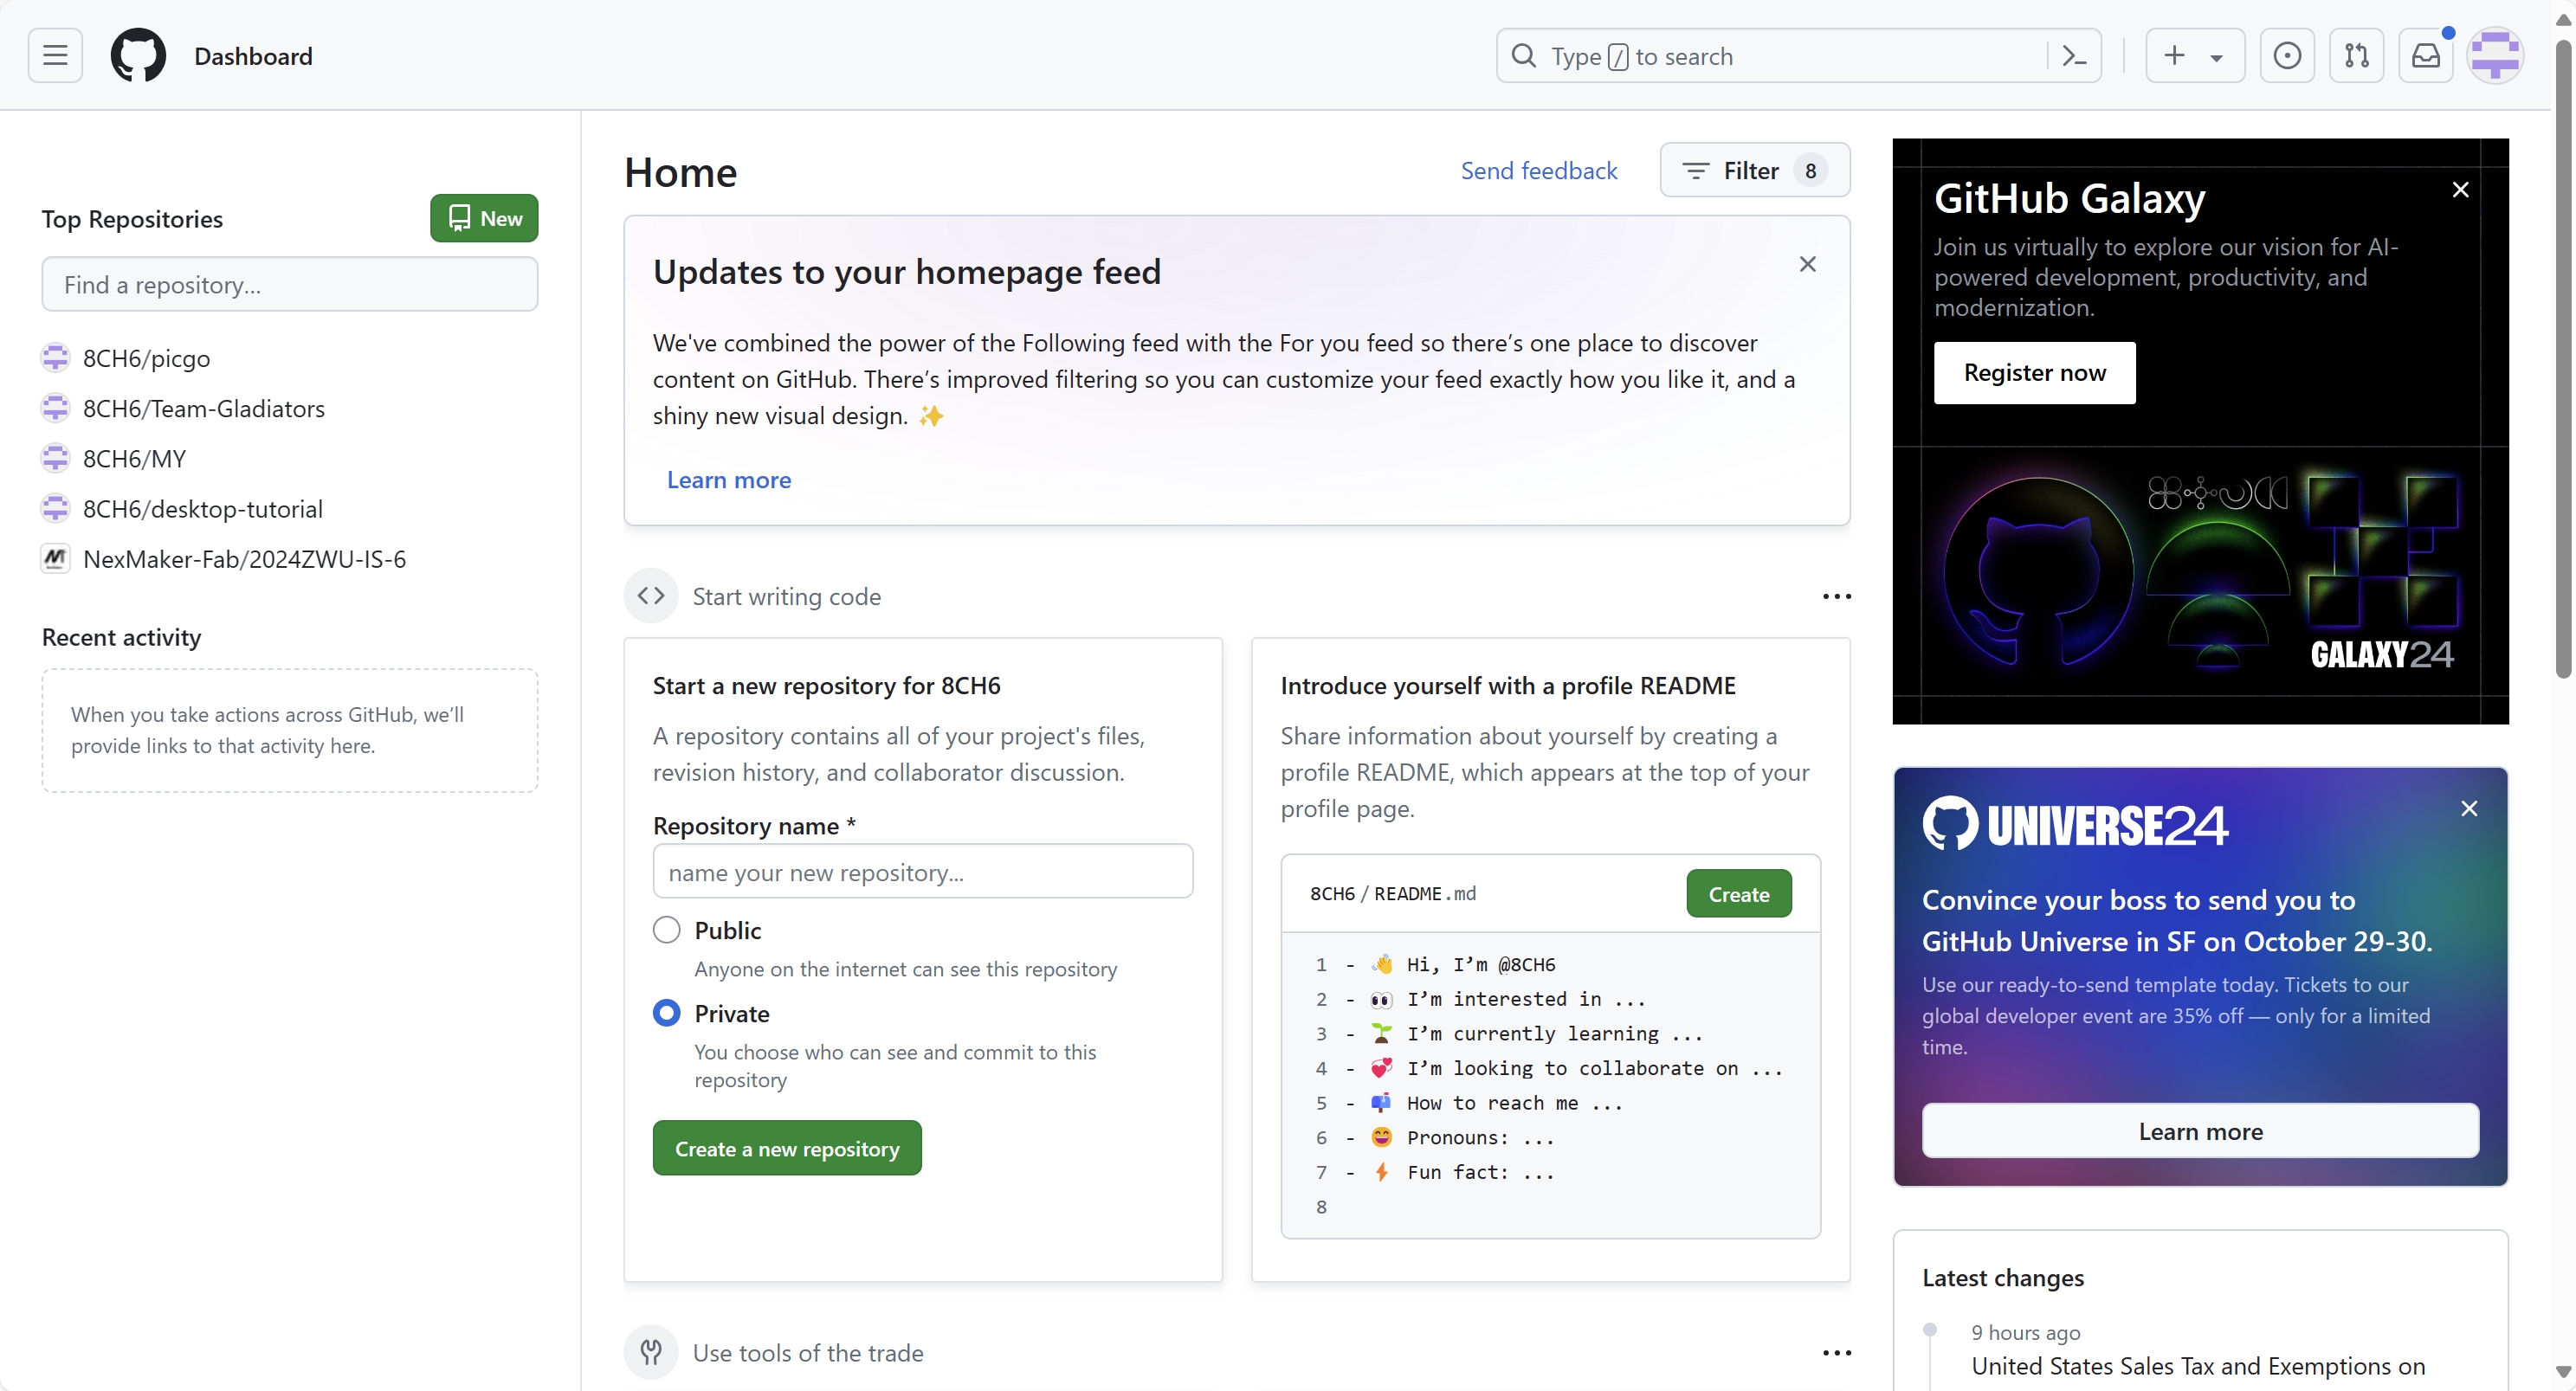
- Github;This is where our web page is hosted. check it
 - Github desktop;Since it is a user-friendly GUI application, we use it to streamline our Git workflow, allowing us to easily clone, commit, and sync repositories.
check it
- Github desktop;Since it is a user-friendly GUI application, we use it to streamline our Git workflow, allowing us to easily clone, commit, and sync repositories.
check it
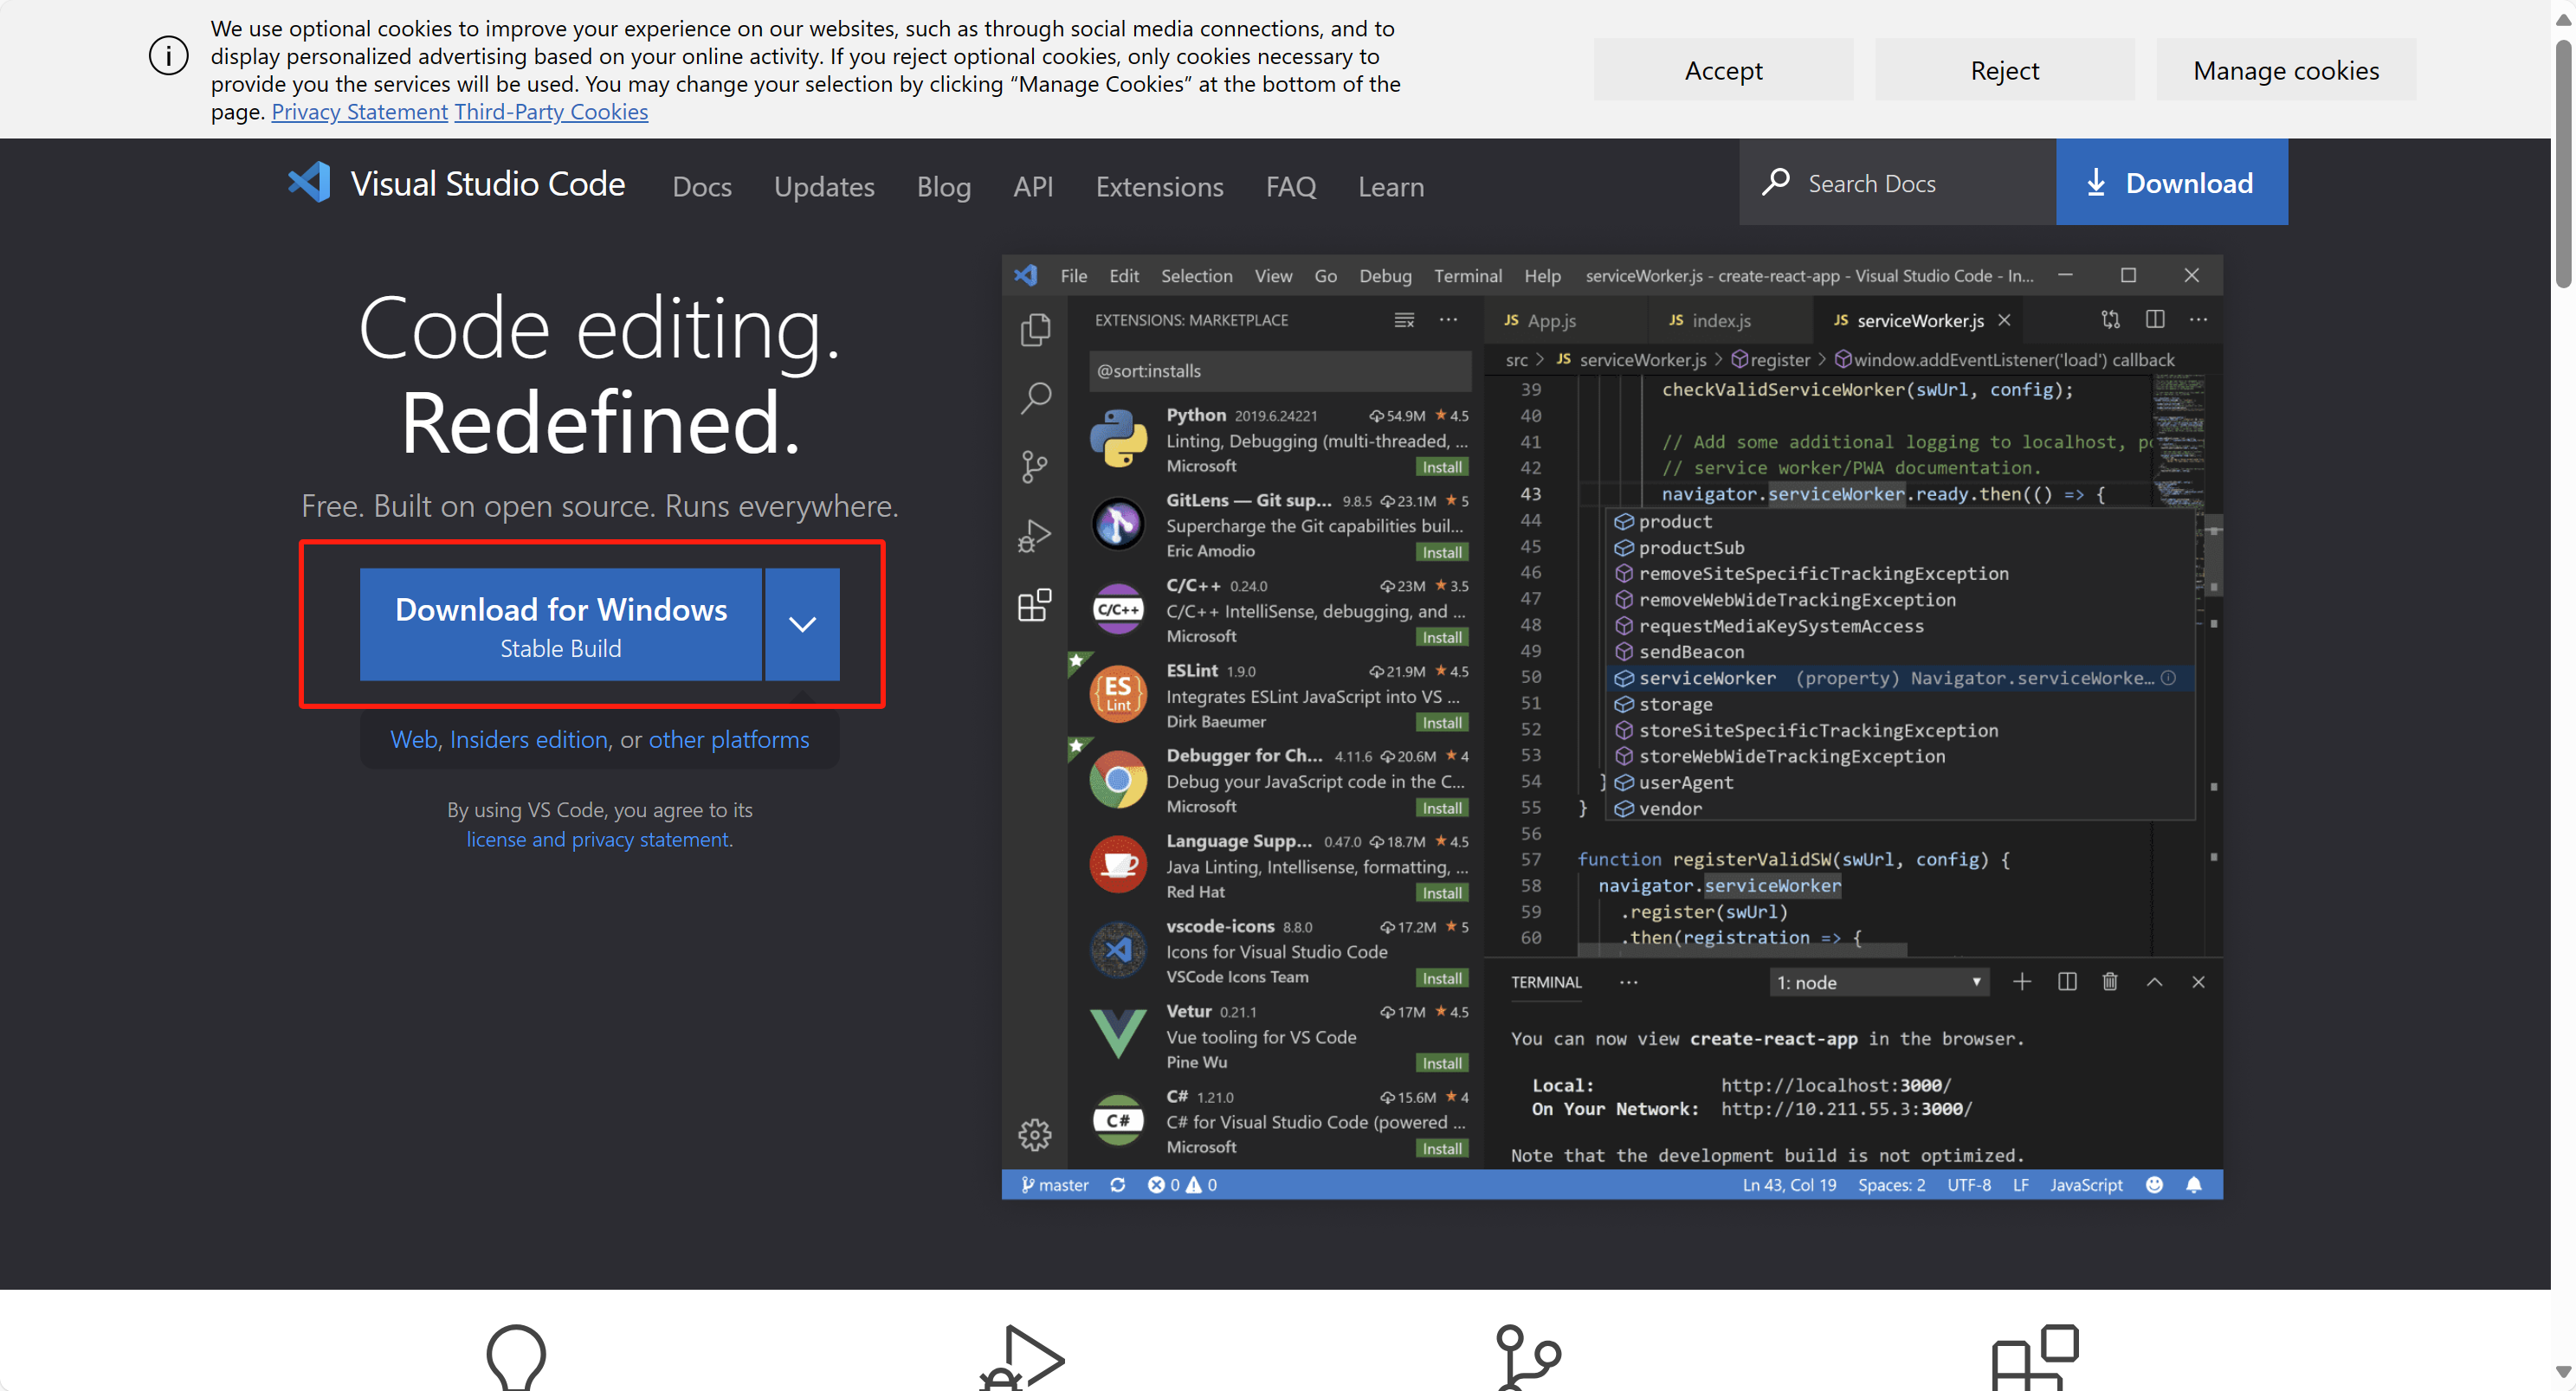
 - VScode; We enhanced our web development workflow with this versatile and customizable tool.
check it
- VScode; We enhanced our web development workflow with this versatile and customizable tool.
check it
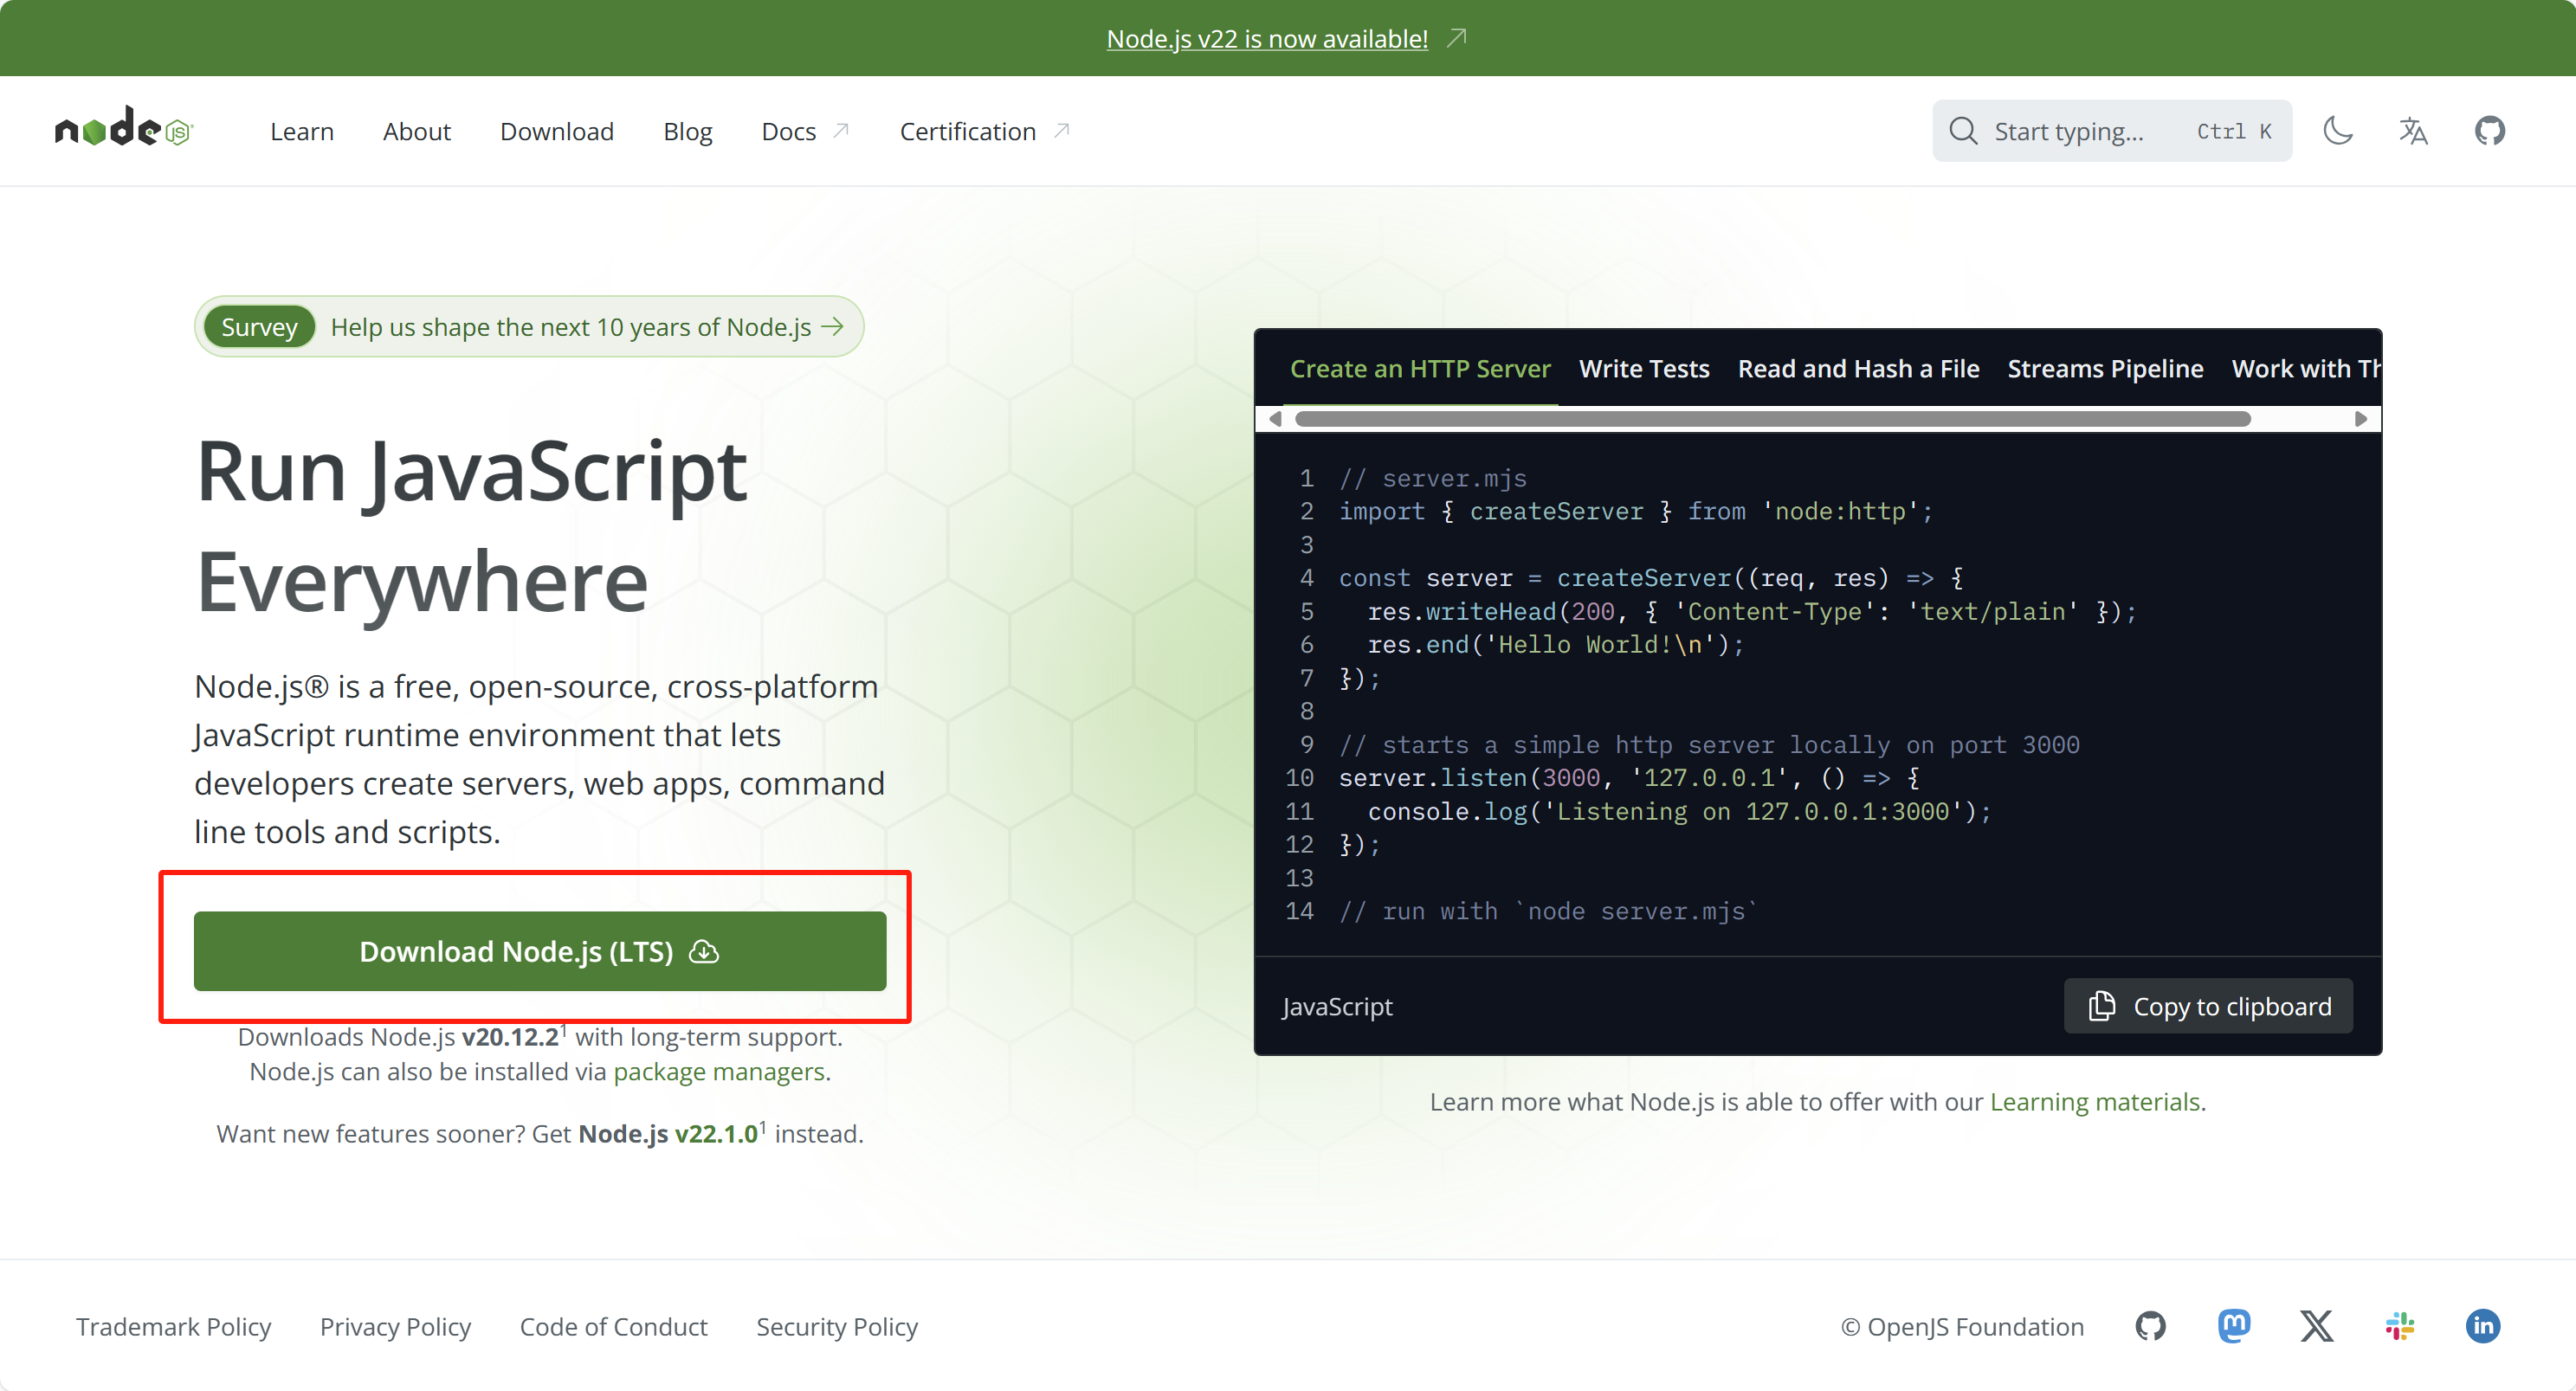
 - Nodejs; Since the tool includes NPM, we used it to manage packages, interact with the command line, and integrate with VScode
check it
- Nodejs; Since the tool includes NPM, we used it to manage packages, interact with the command line, and integrate with VScode
check it
- Picgo;Photo upload tool and photo bed album management software check it
STEP 2 : Open repository into GitHub
NB: Before we begin, it is worth noting that the GitHub repository had already been setup for our team website by our supervisor. It enables us to upload our website pages to a server for us to edit as team and also setup for others to open and view the work we have done during the course of the module.Repository Setup for Nexmaker:
Set up the page
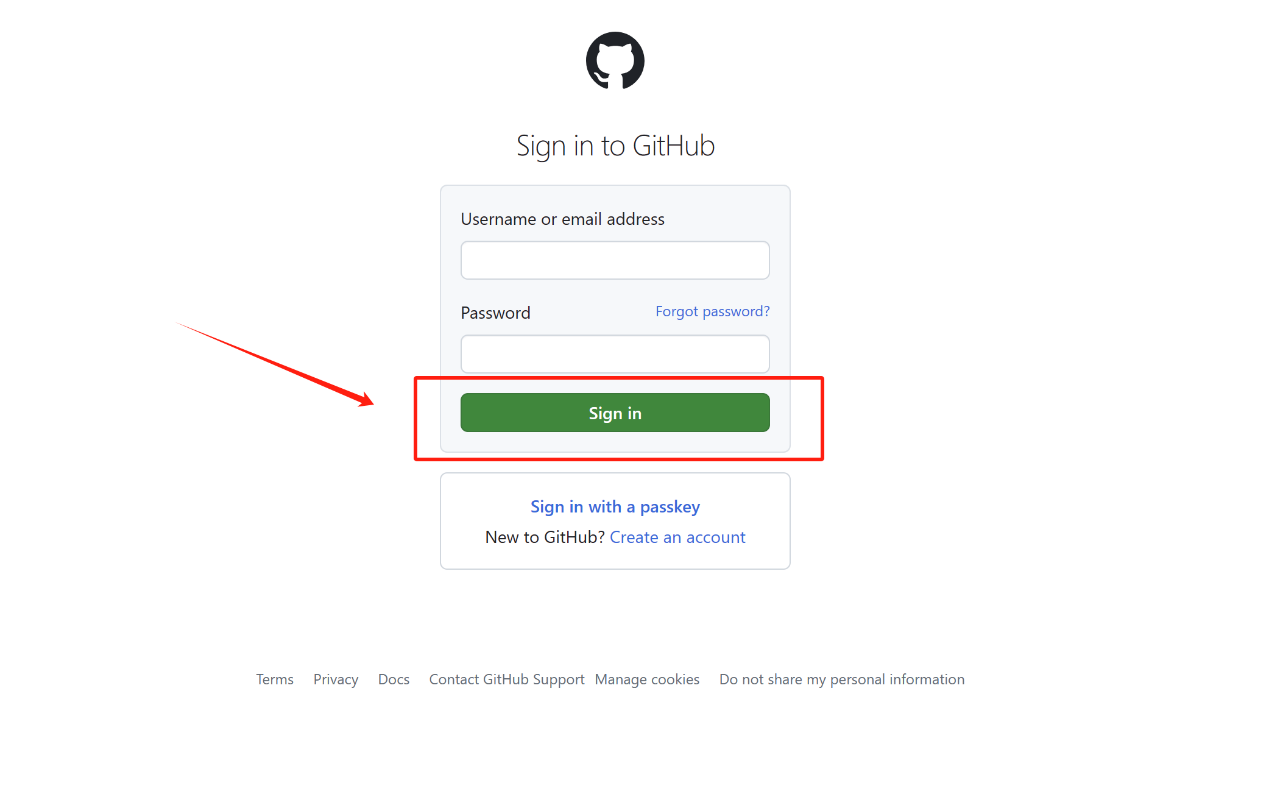
We visited the GitHub website (https://github.com) and registered a new account, login.
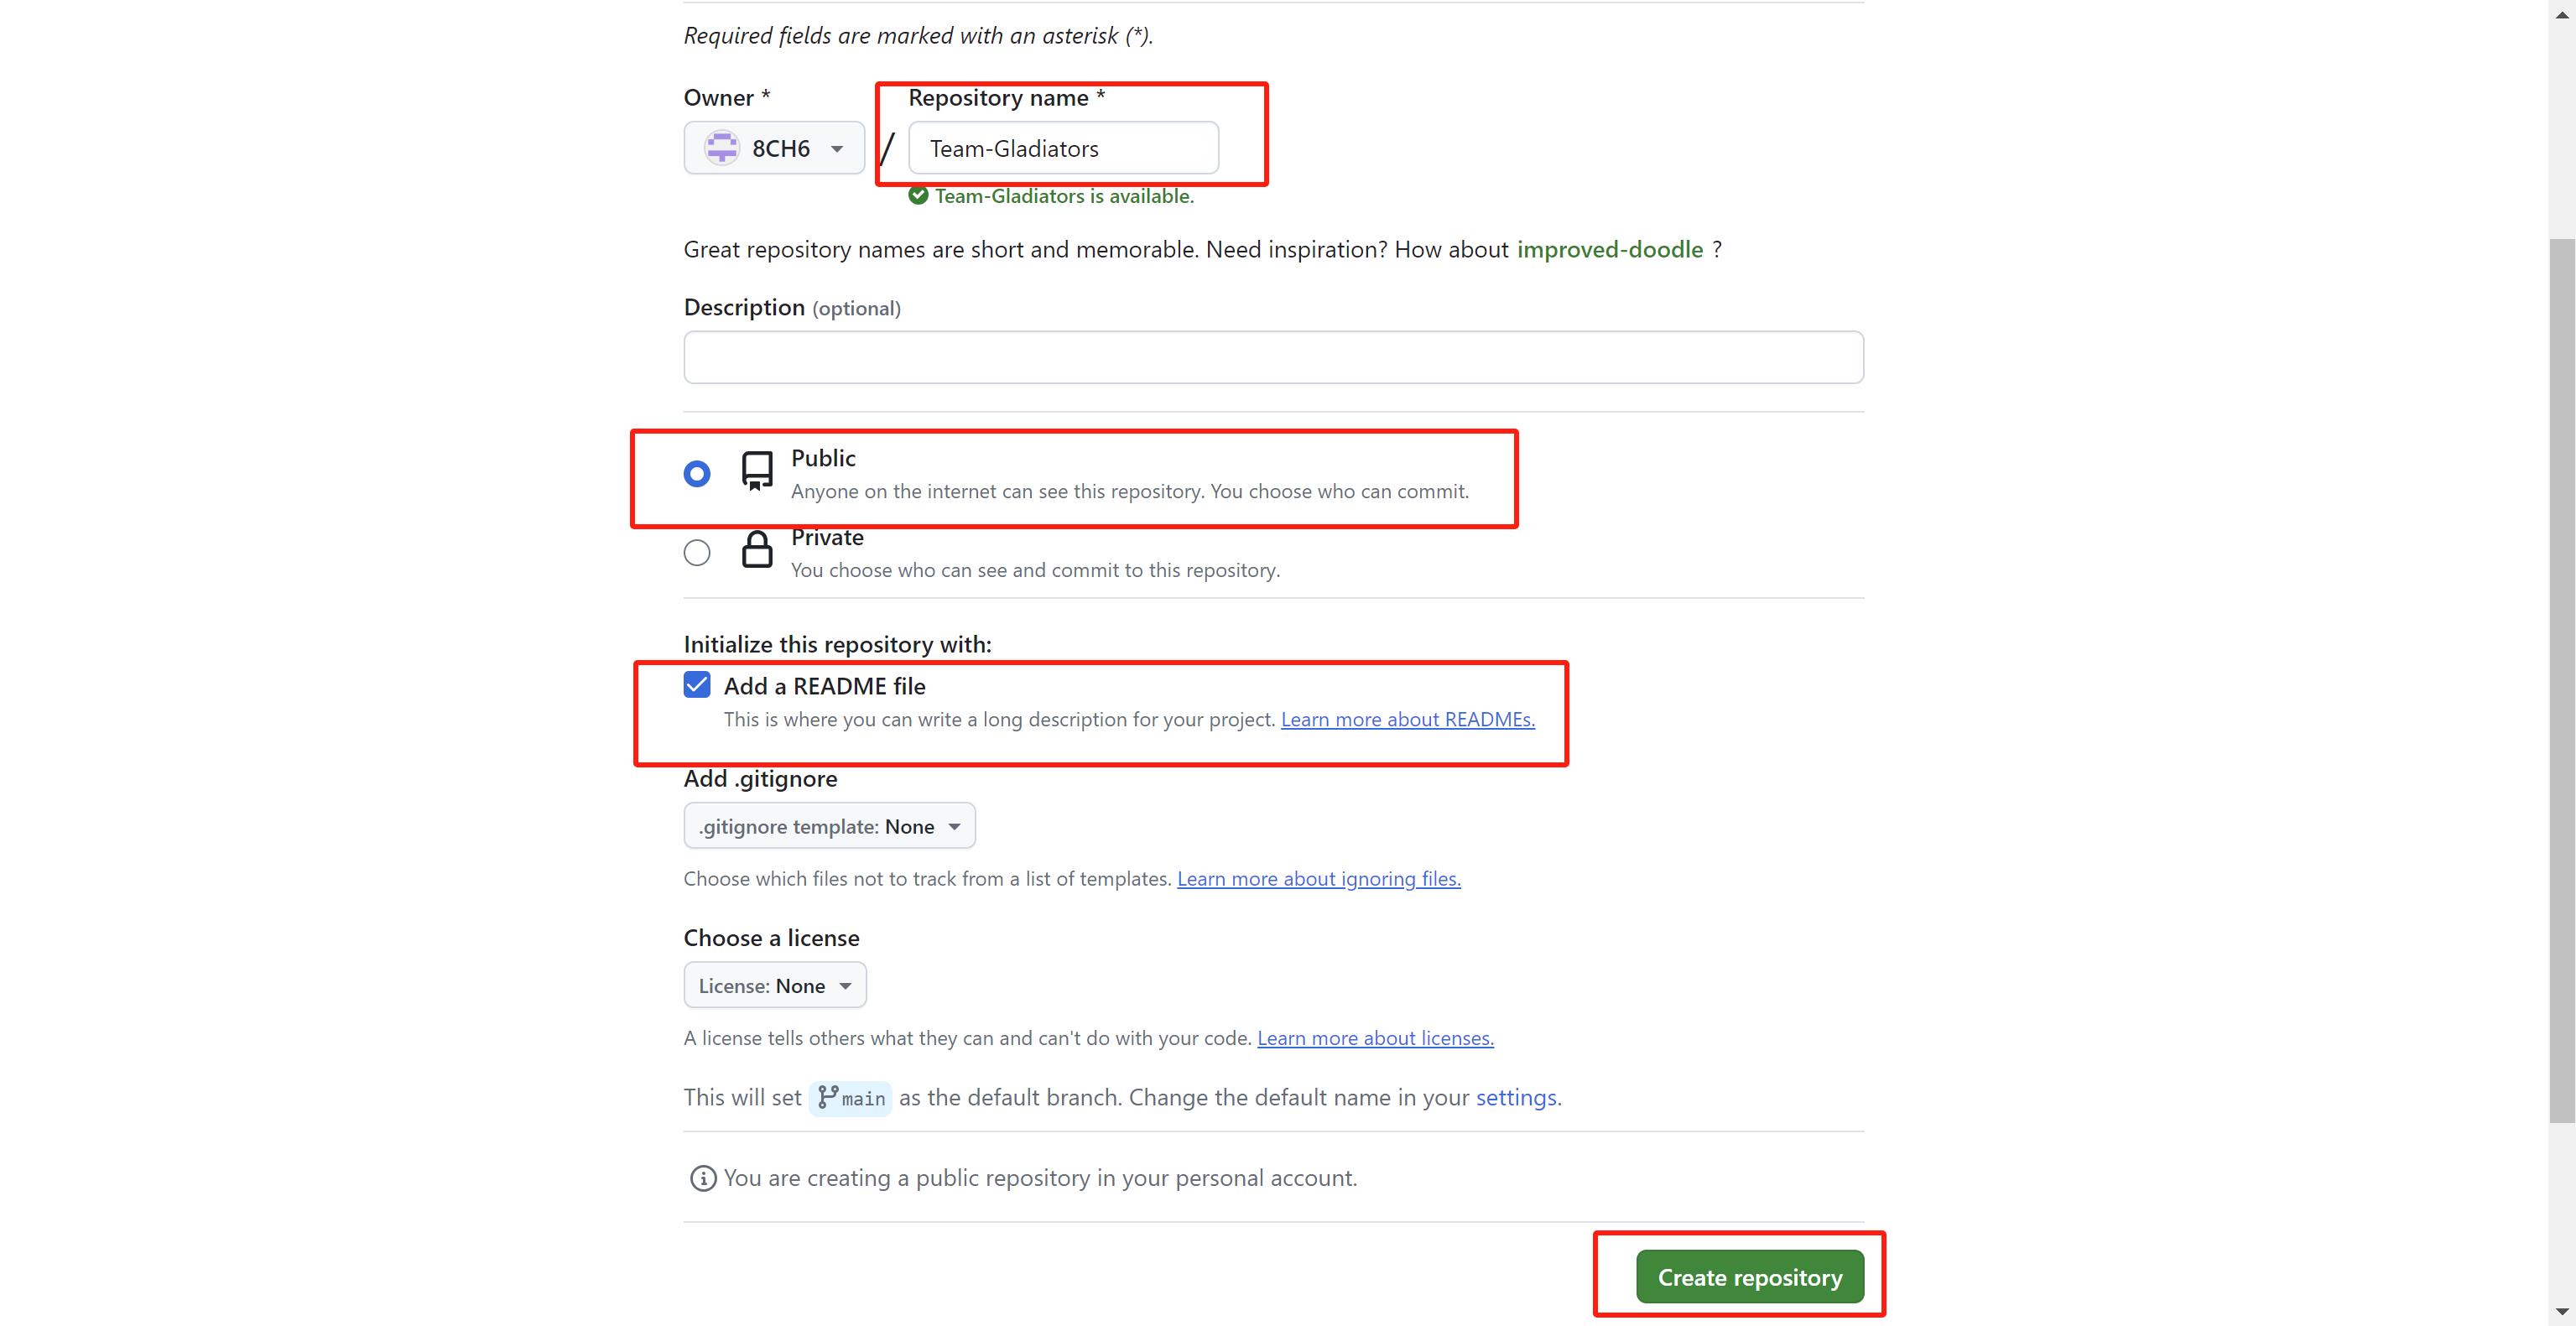
 Firstly, register and establish a public repository on github.com for others to modify. Also, include a README file to describe the website.
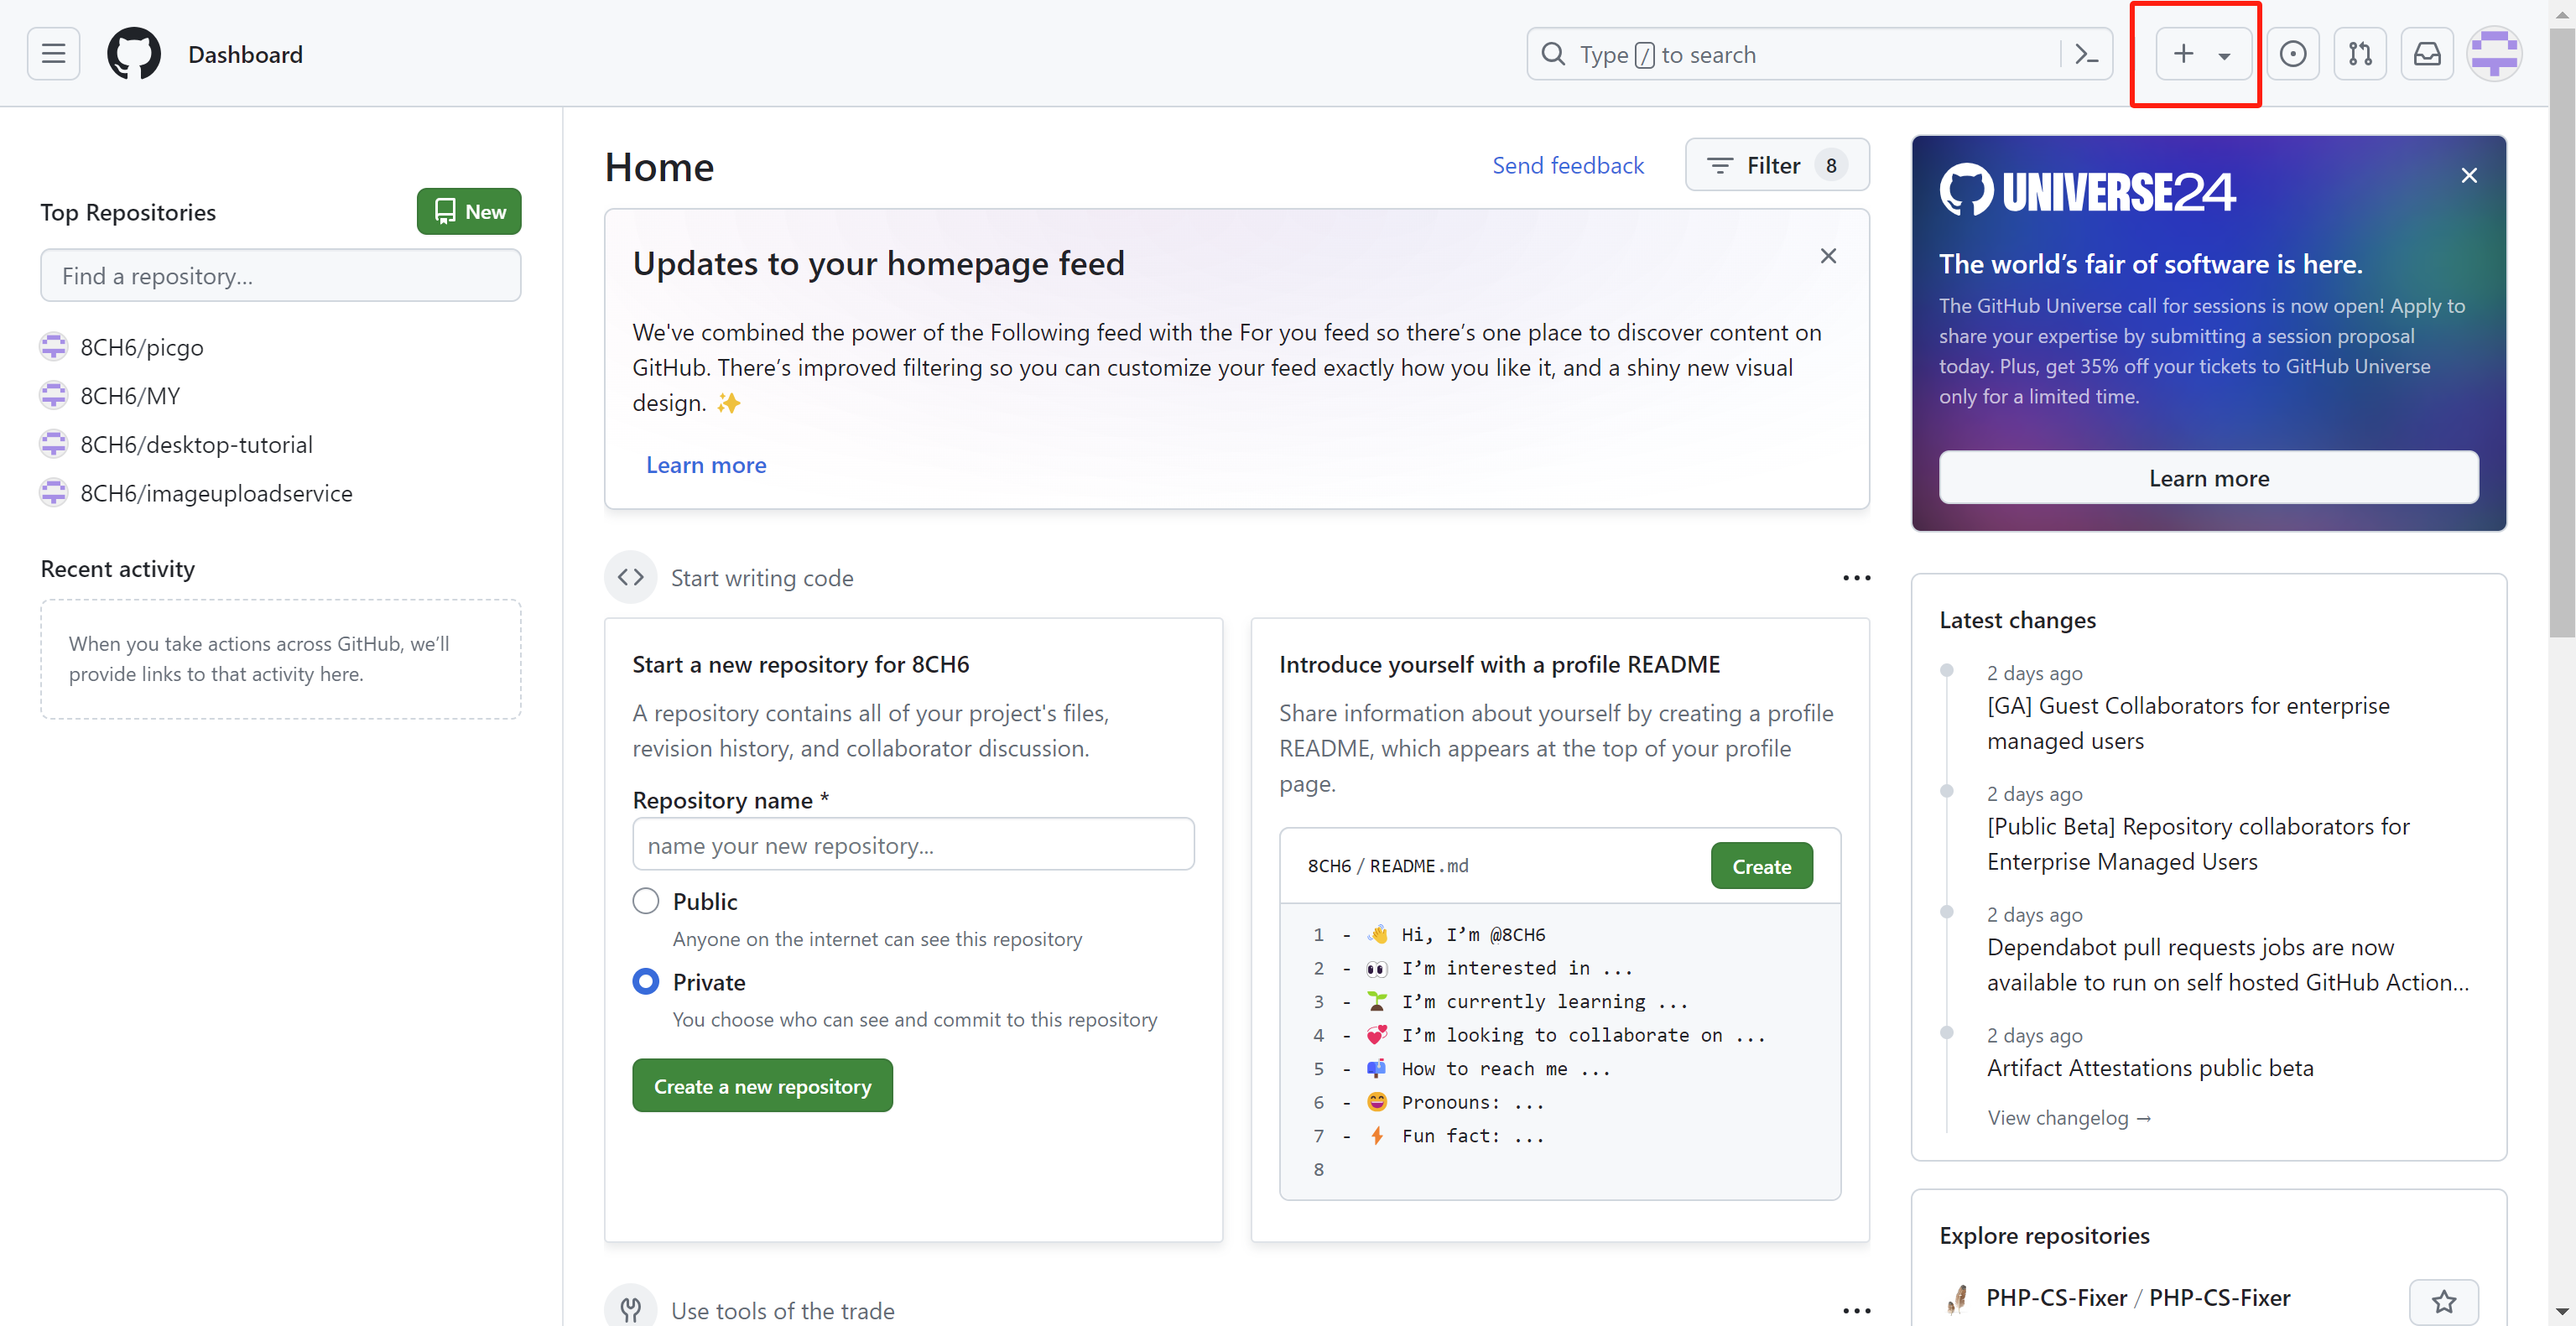
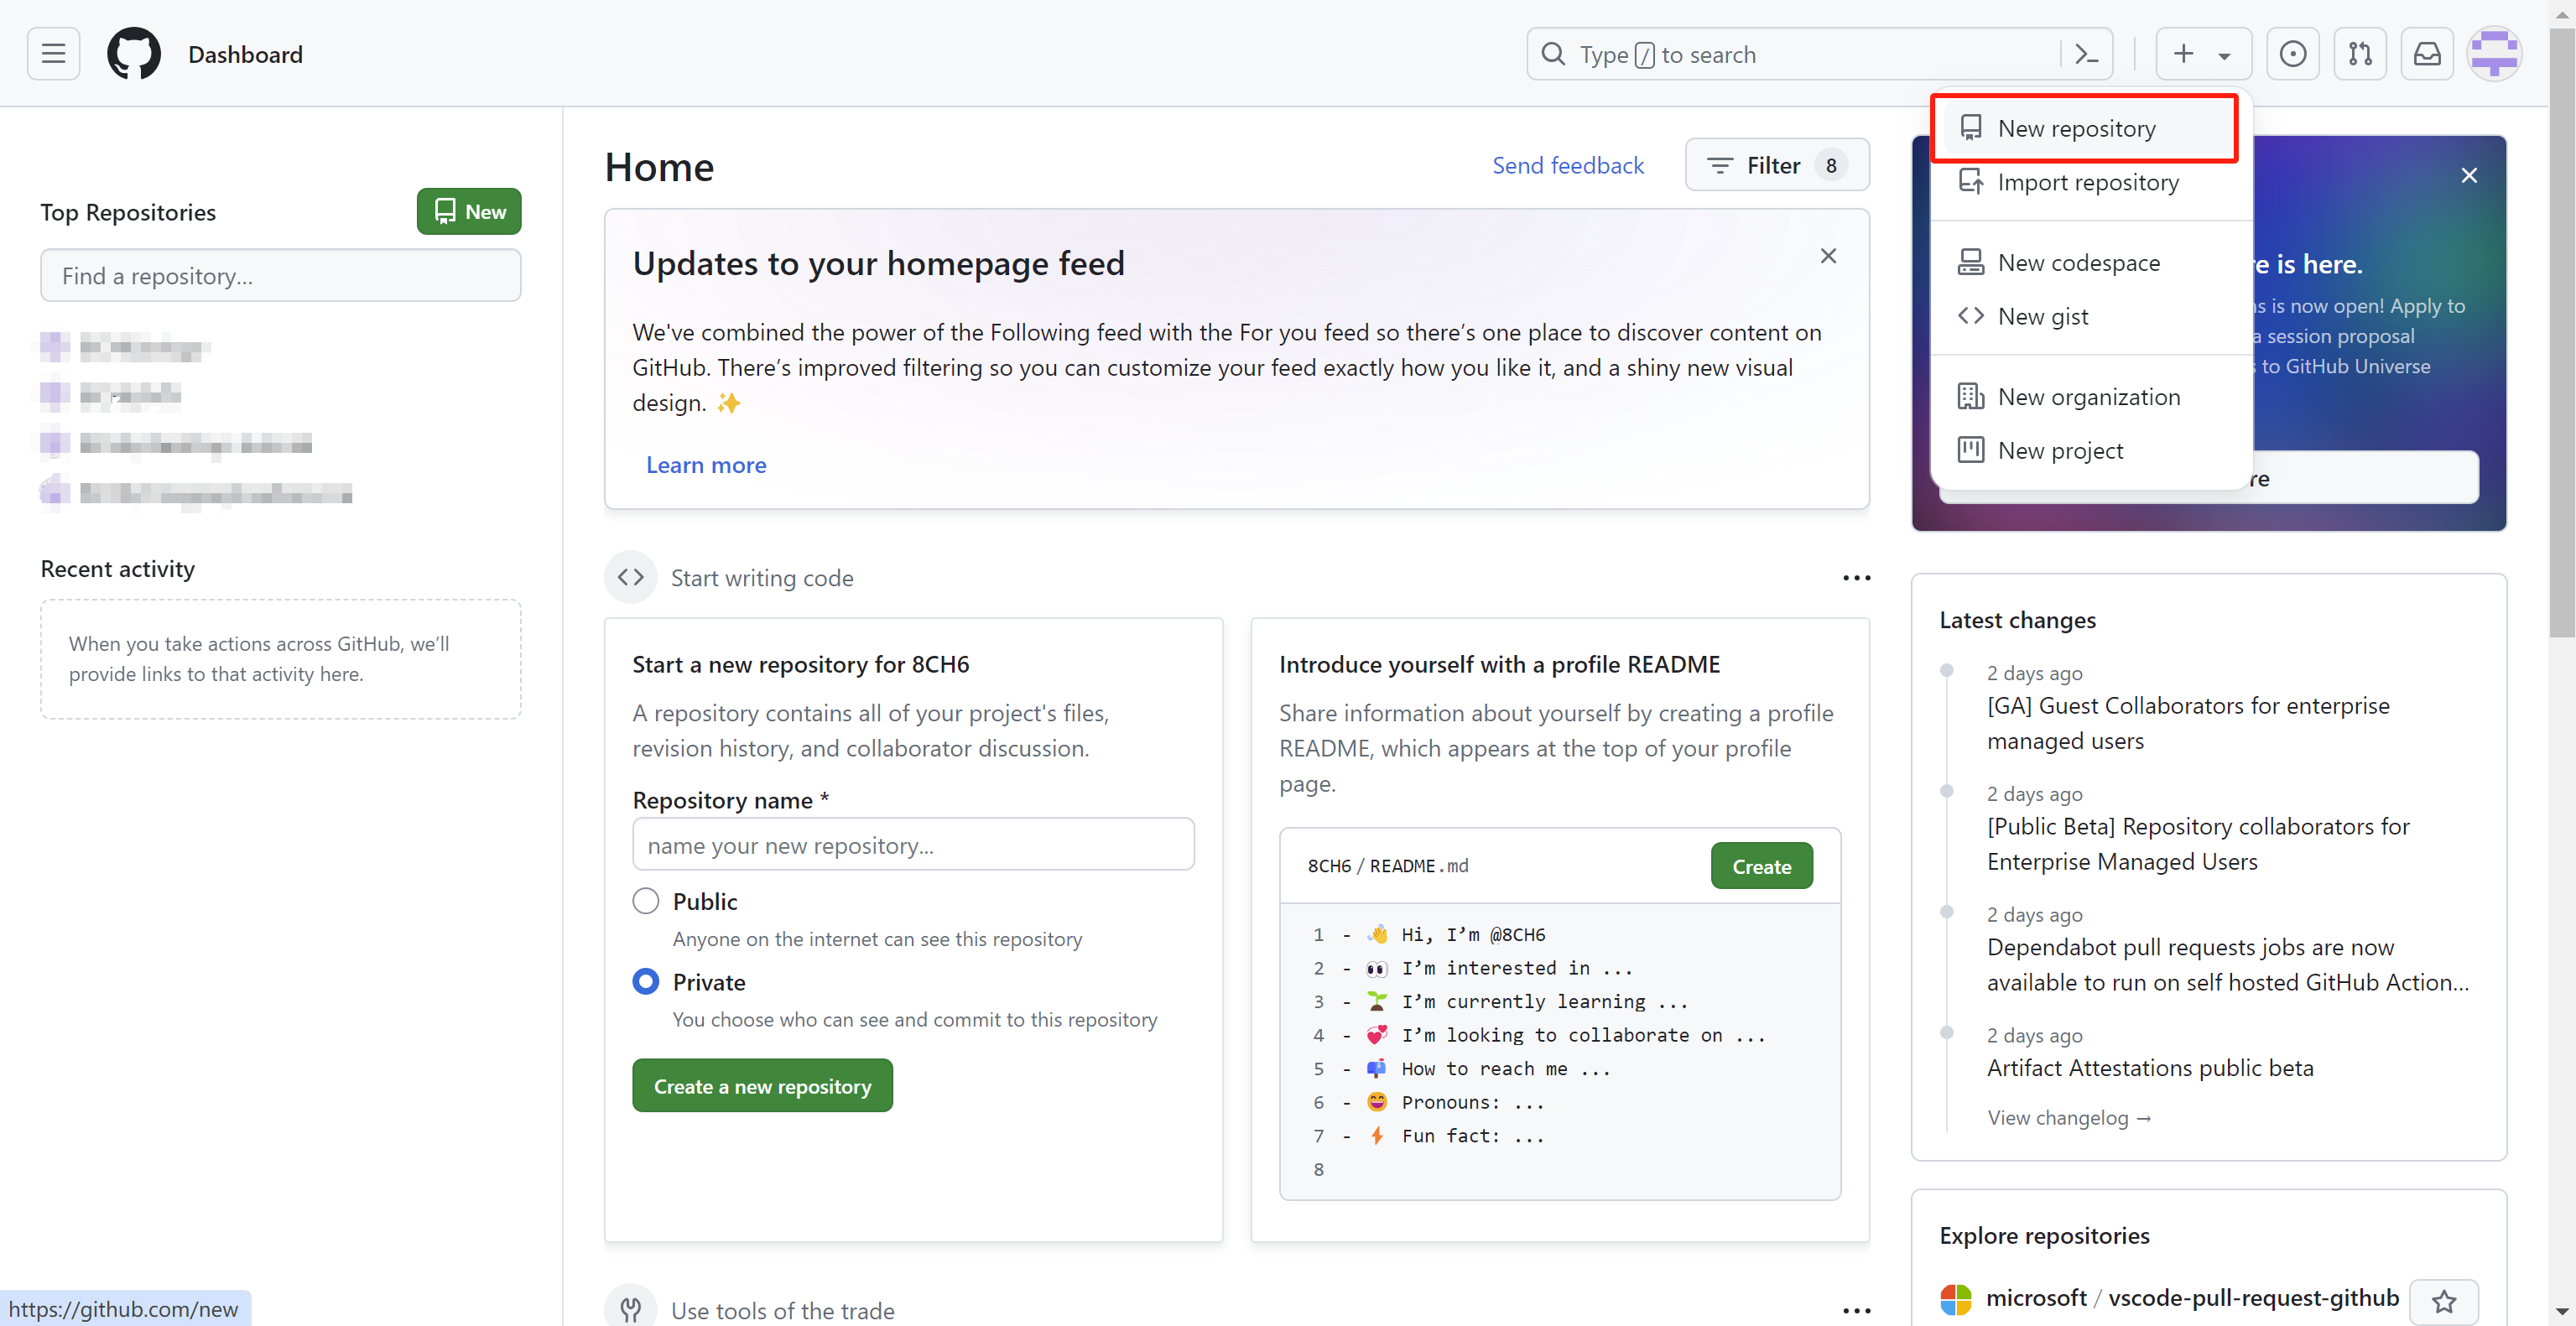
There are two ways to open the new repository page:
Firstly, register and establish a public repository on github.com for others to modify. Also, include a README file to describe the website.
There are two ways to open the new repository page:
Method 1:

Method 2:
 Then we gave it a name (Team-Gladiators) being in the admin's account and selected whether it should be public or private. Then, after enabling the readme, click create repository.
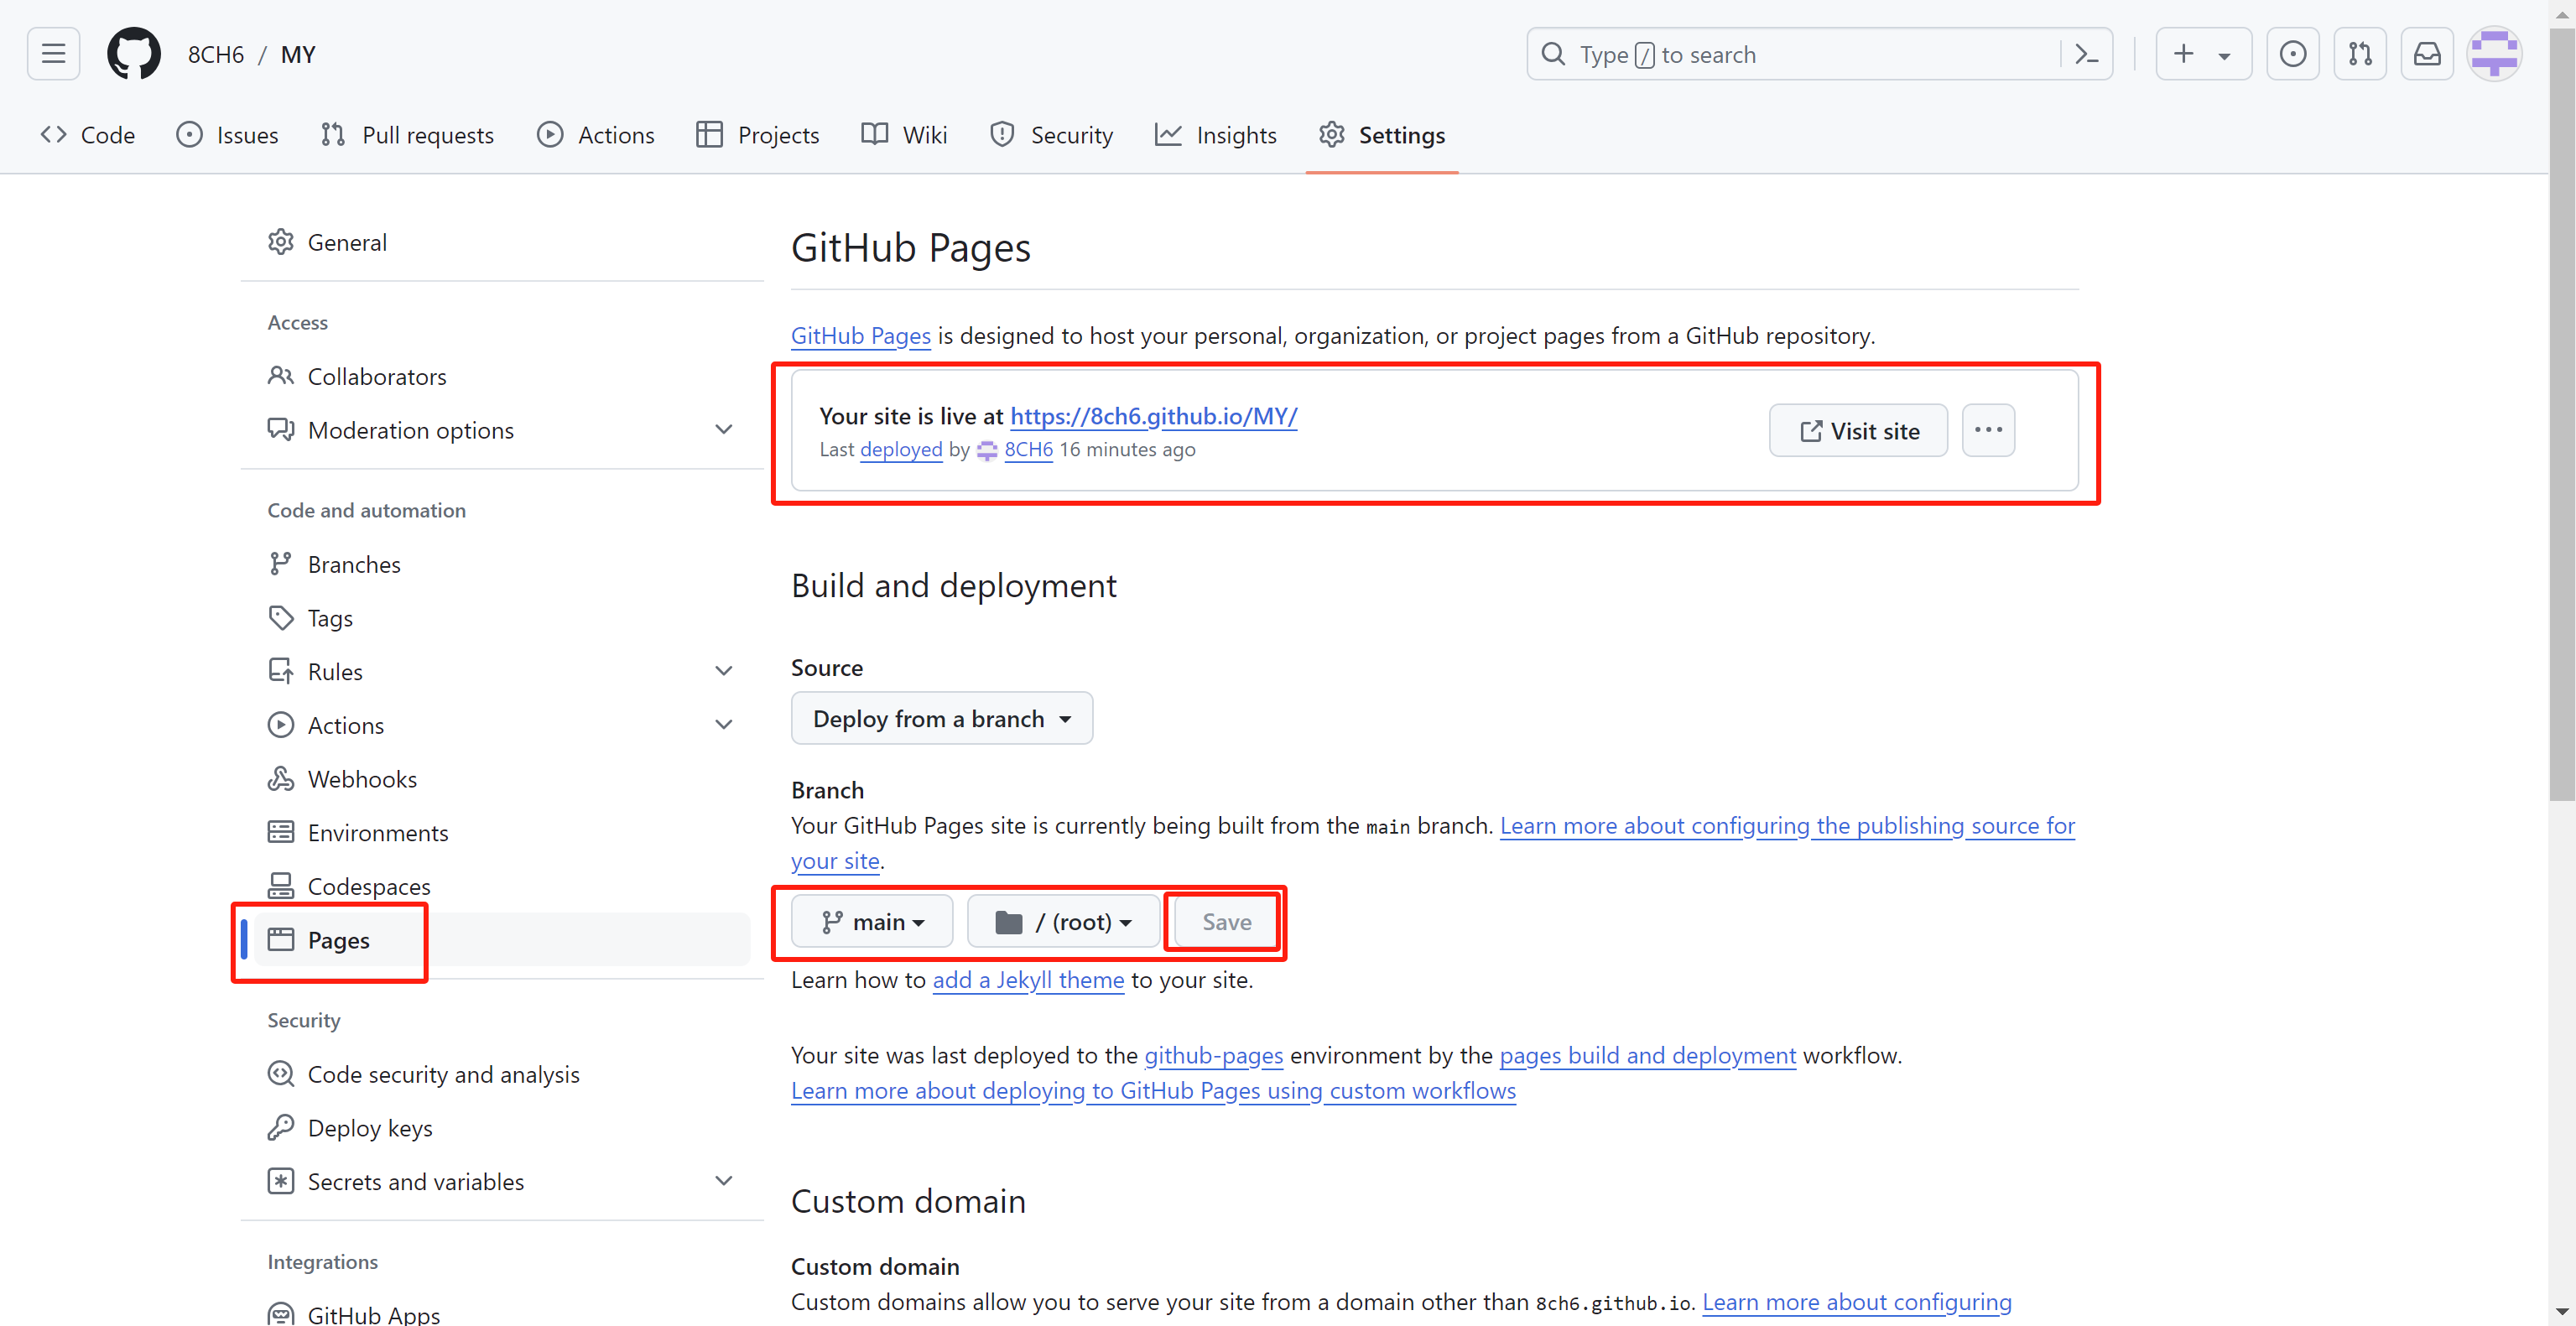
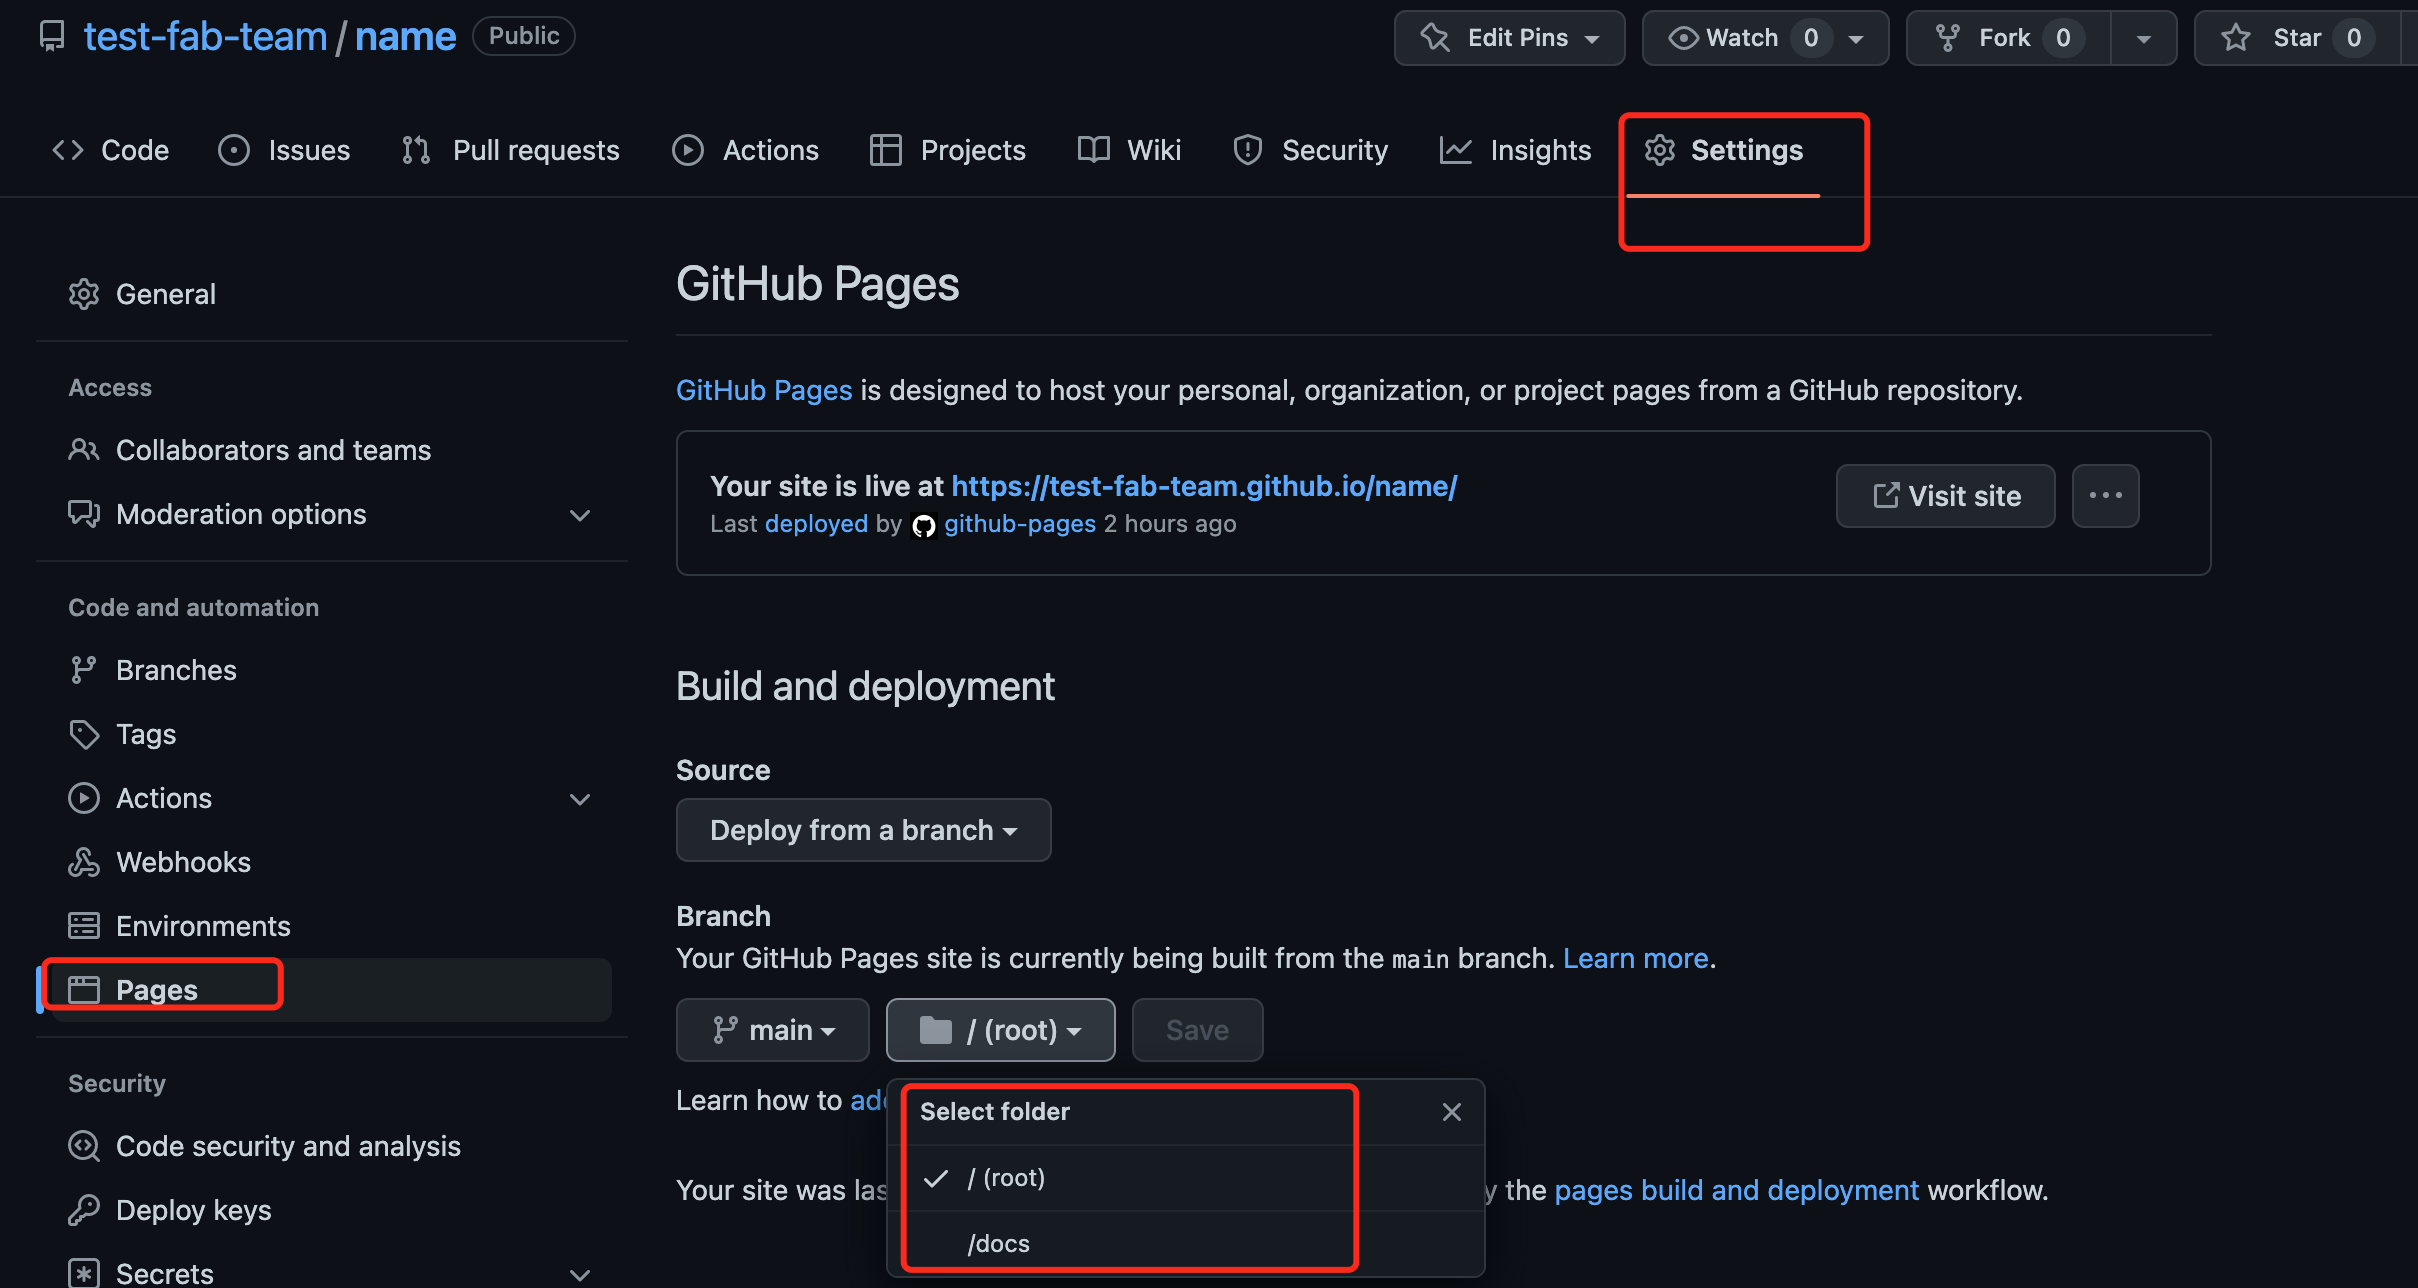
 Go to repository settings, choose 'Pages' in the sidebar. Under GitHub pages, select main and '/root', then save. This will be switched to '/docs' after installing Docsify, as it's not yet set up.
How to collaborate with team
(As we outline the methods of team collaboration post-website development, the images used are from our team repository. Don't let the repository name confuse you. When collaborating with your team, remember to use your team's repository and follow these steps)
Emphasizing on team collaboration is vital for this course due to the substantial workload, which could otherwise be tiring. If the team works cohesively, the course will be manageable, enjoyable, and won't interfere with your leisure time.
Team Operations
Given that students come from various fields, engaging with a diverse group on GitHub can be a stimulating experience. This diversity can enrich the team's collective skills, provide a range of perspectives, and amplify the productivity and inclusiveness of the environment. Here's a comprehensive guide on using GitHub for collaboration when team members originate from diverse sectors:
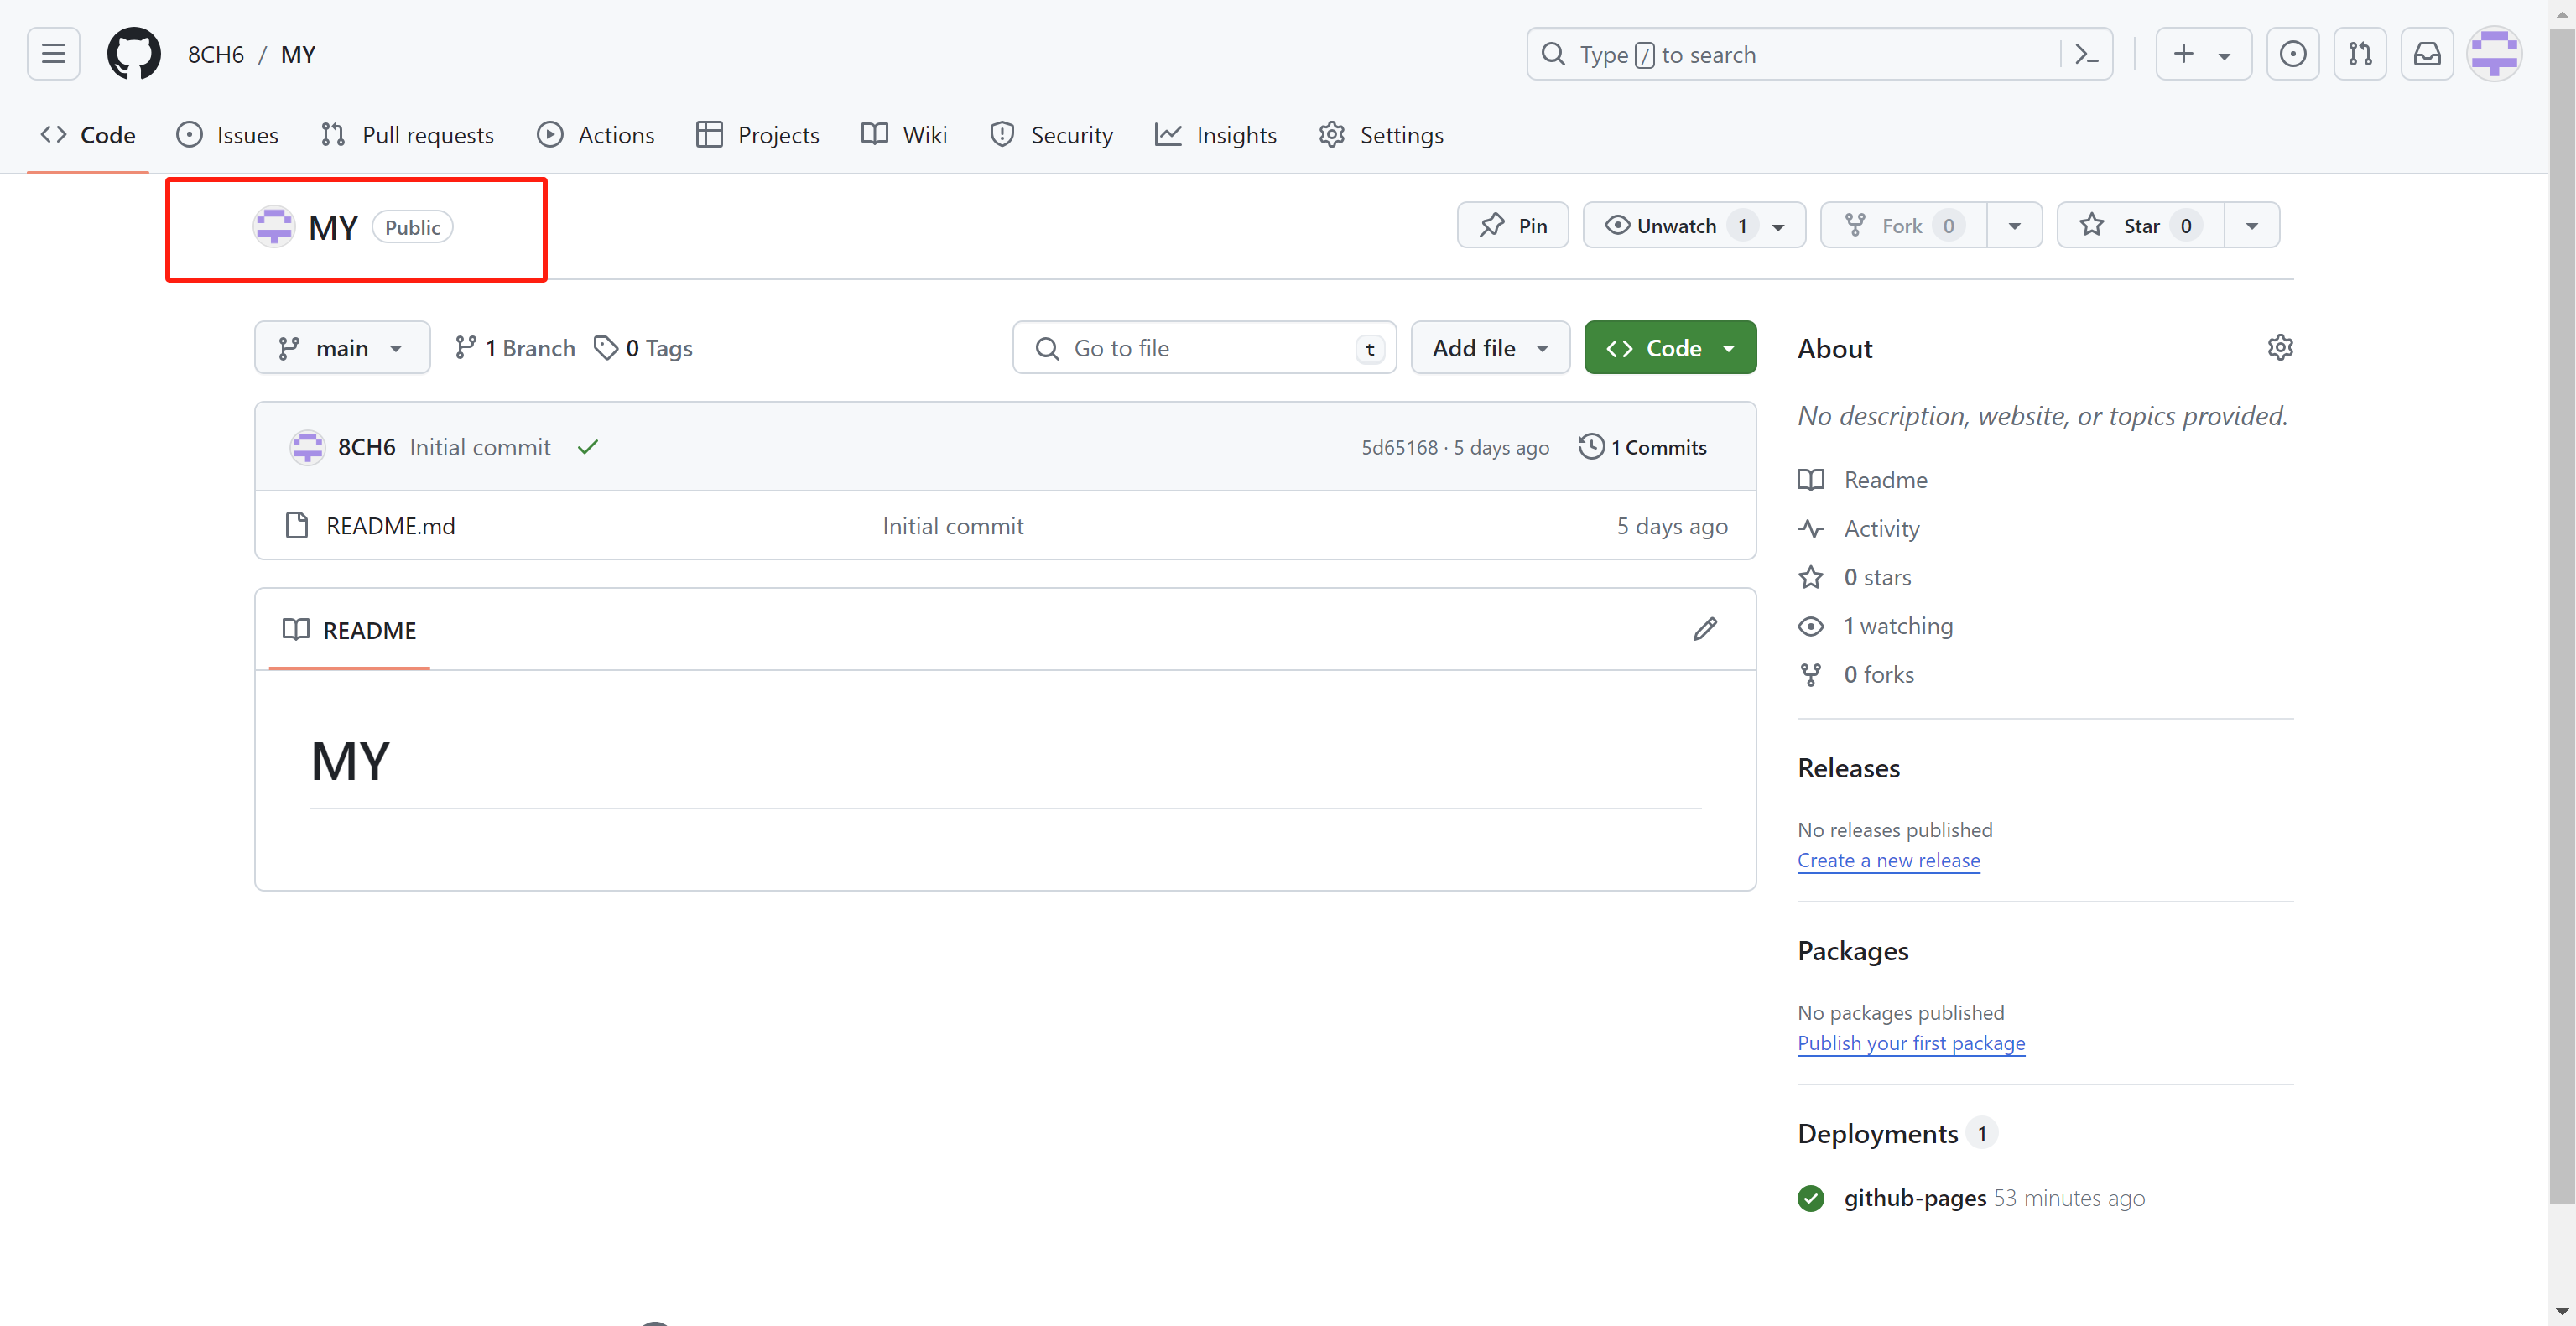
STEP 1 : Open the repository.
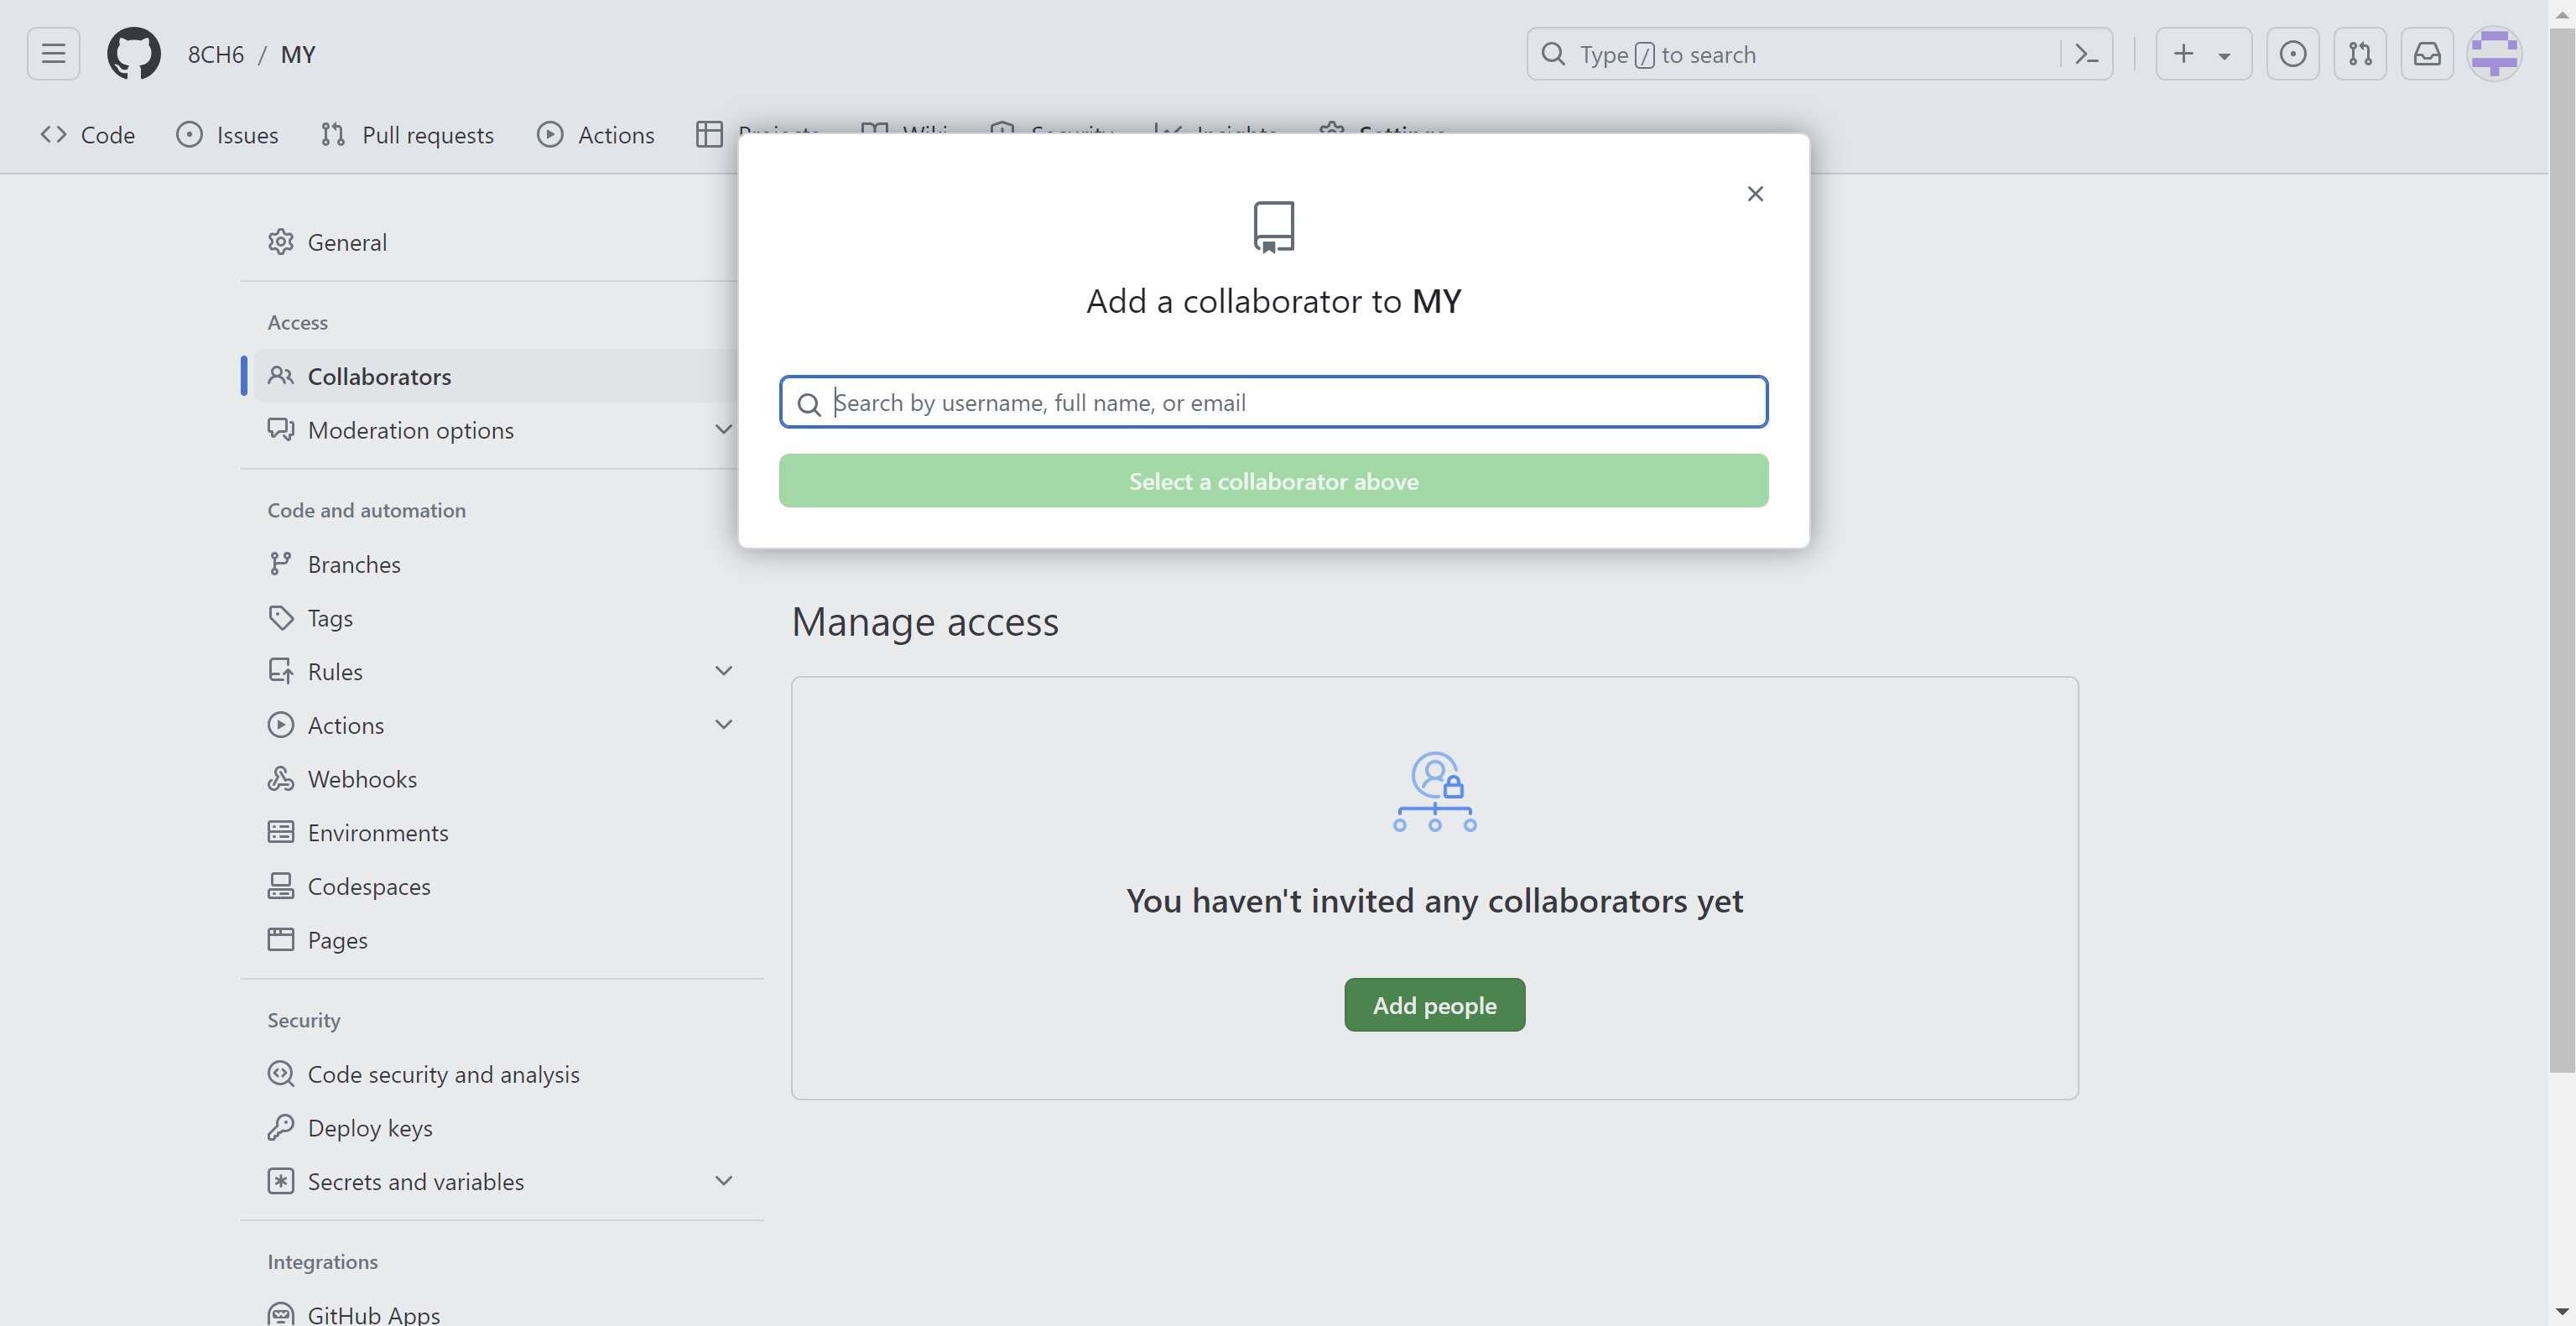
STEP 2 : Go to setting > Collaborators and teams > and click Add people from the manage access section
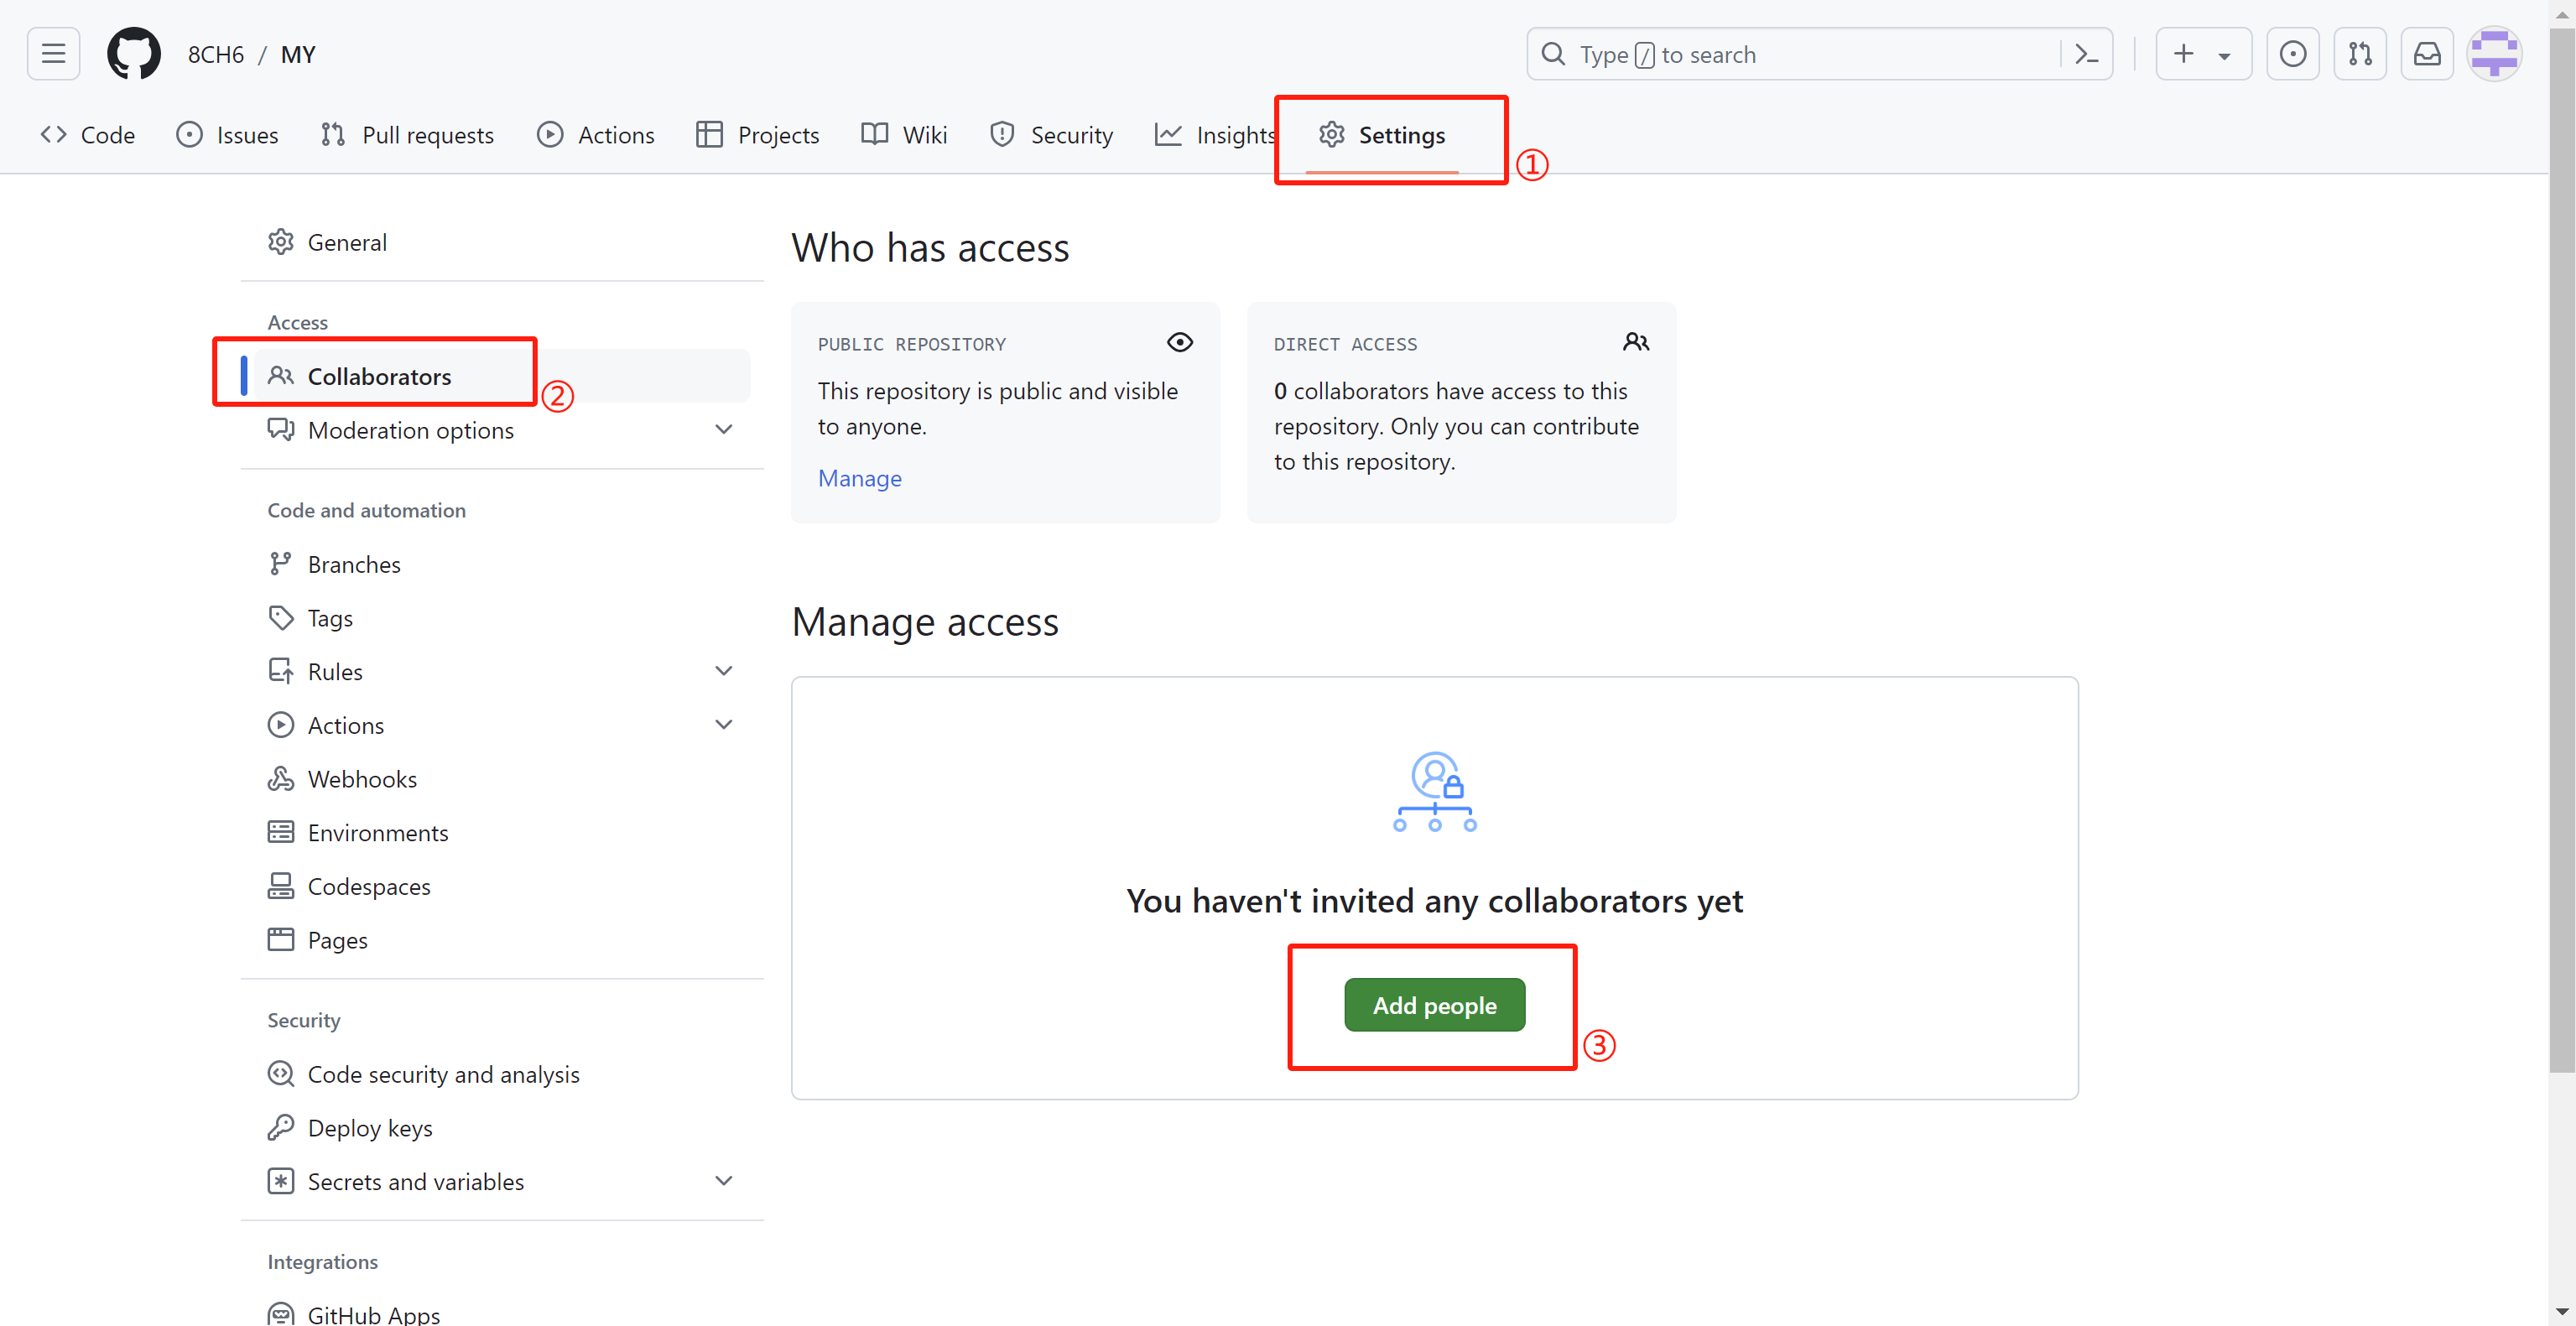
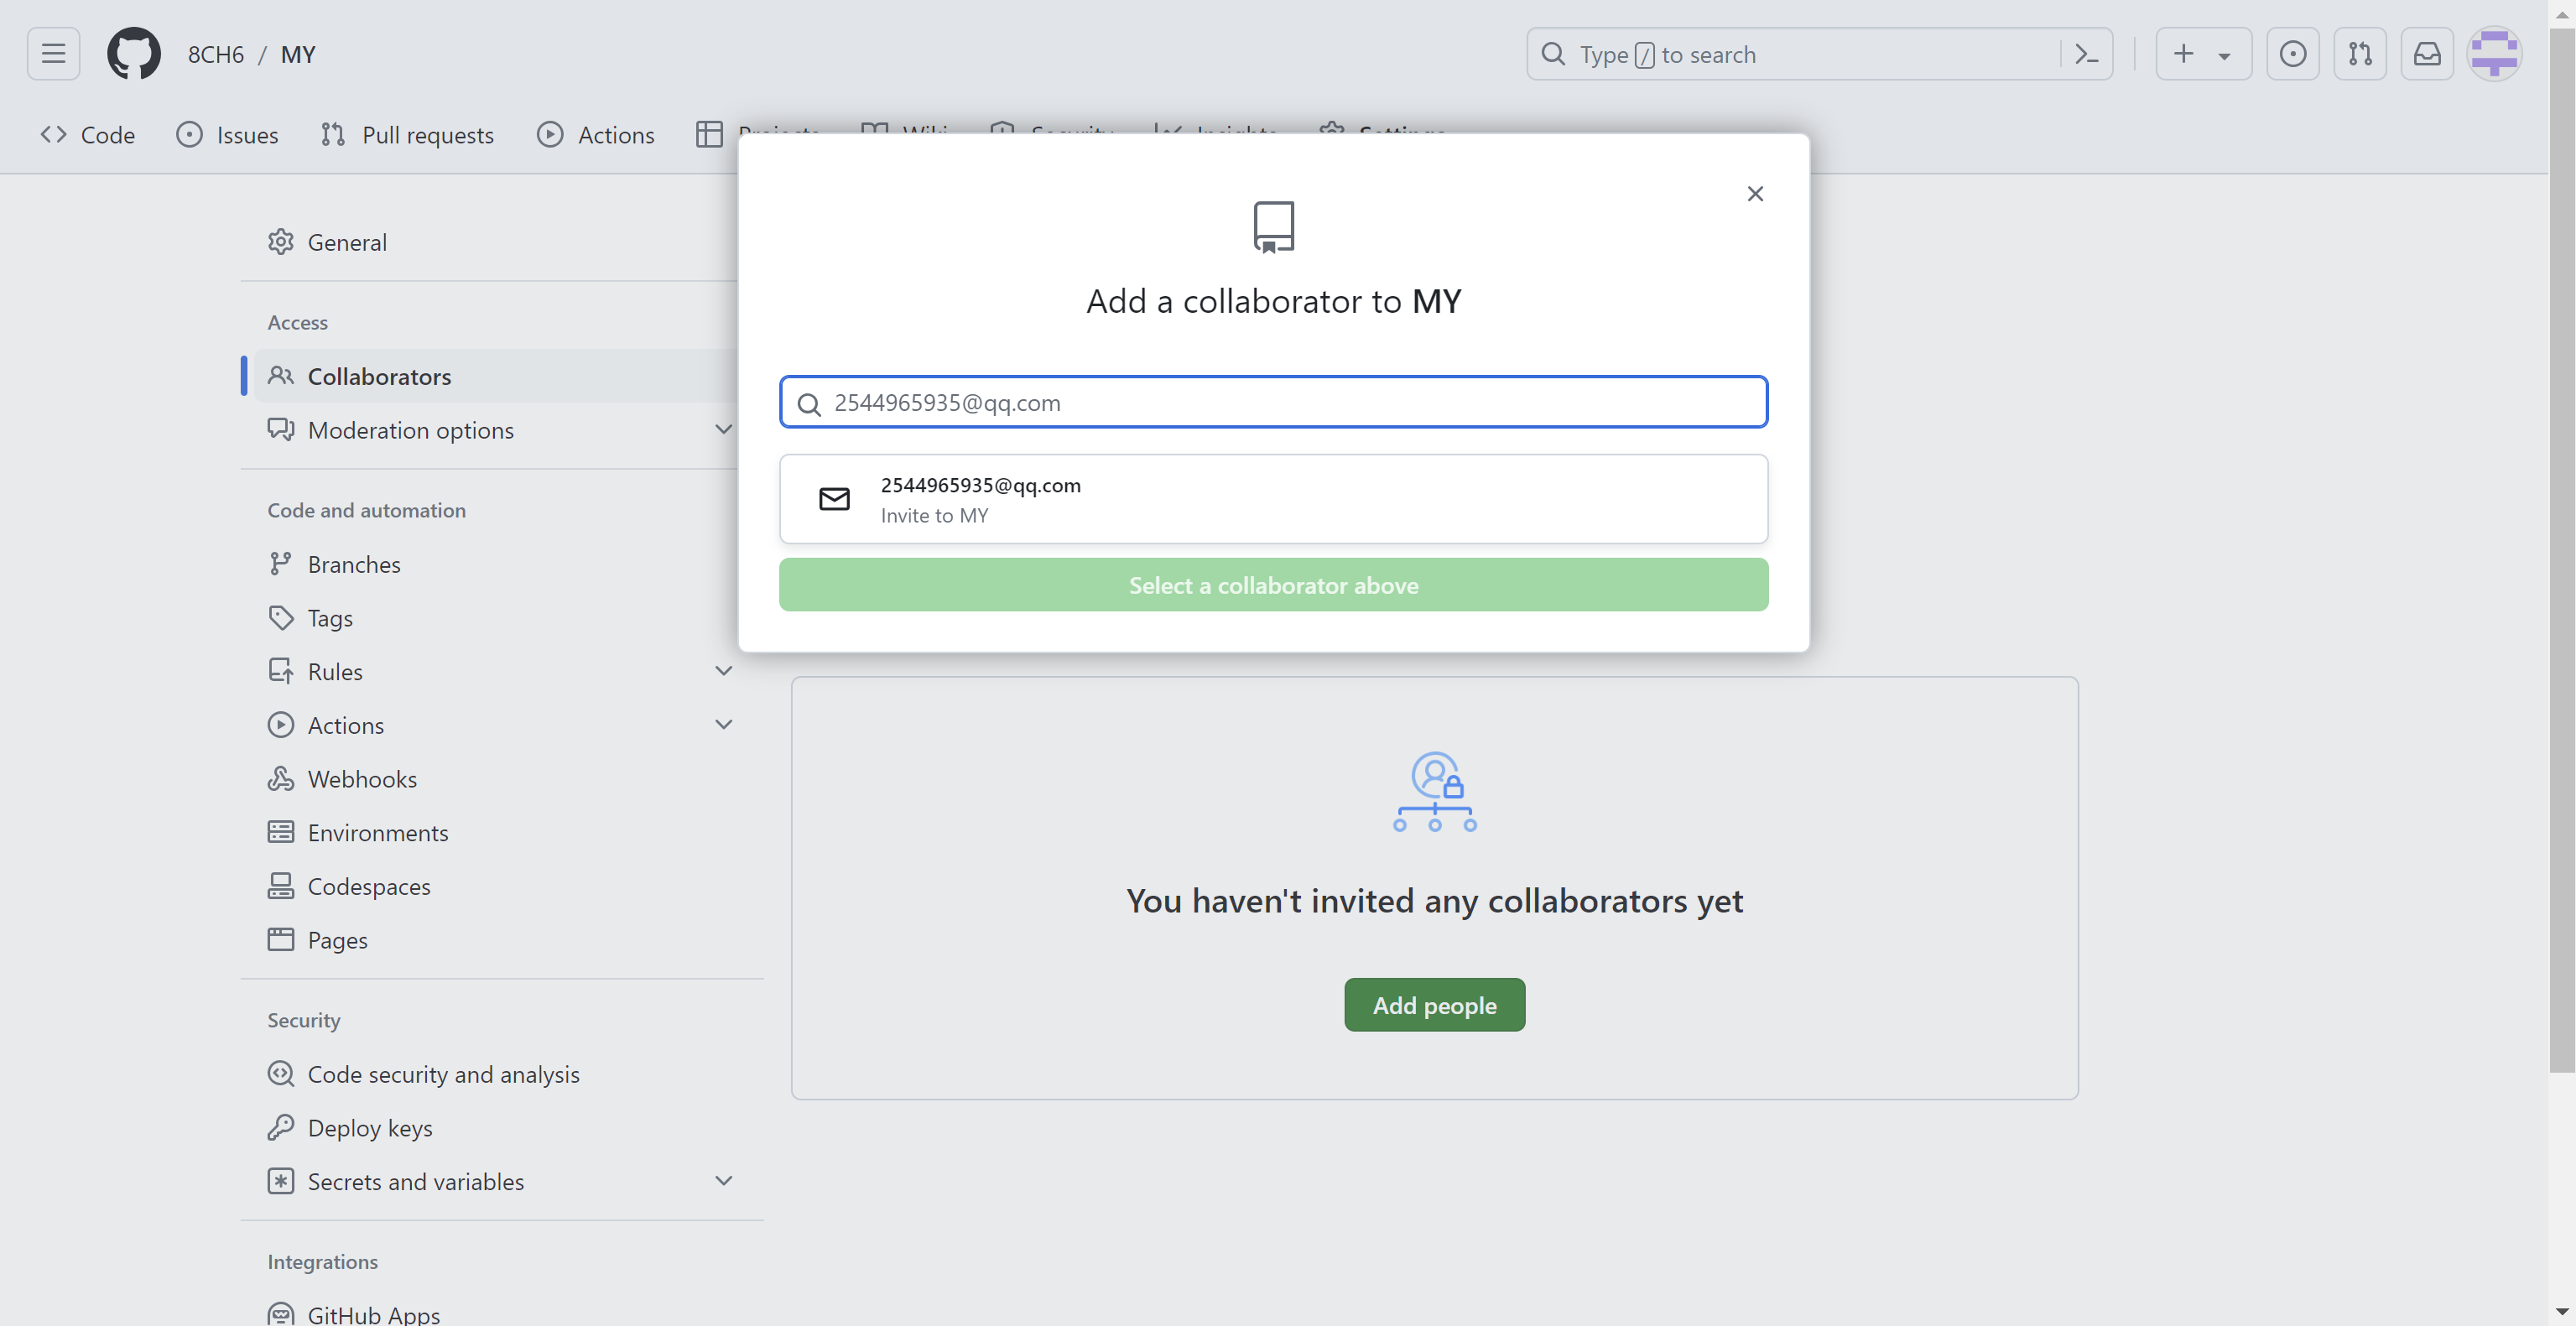
STEP 3 : Search for member by their name or email address
STEP 4 : Select the member and choose the role and Add
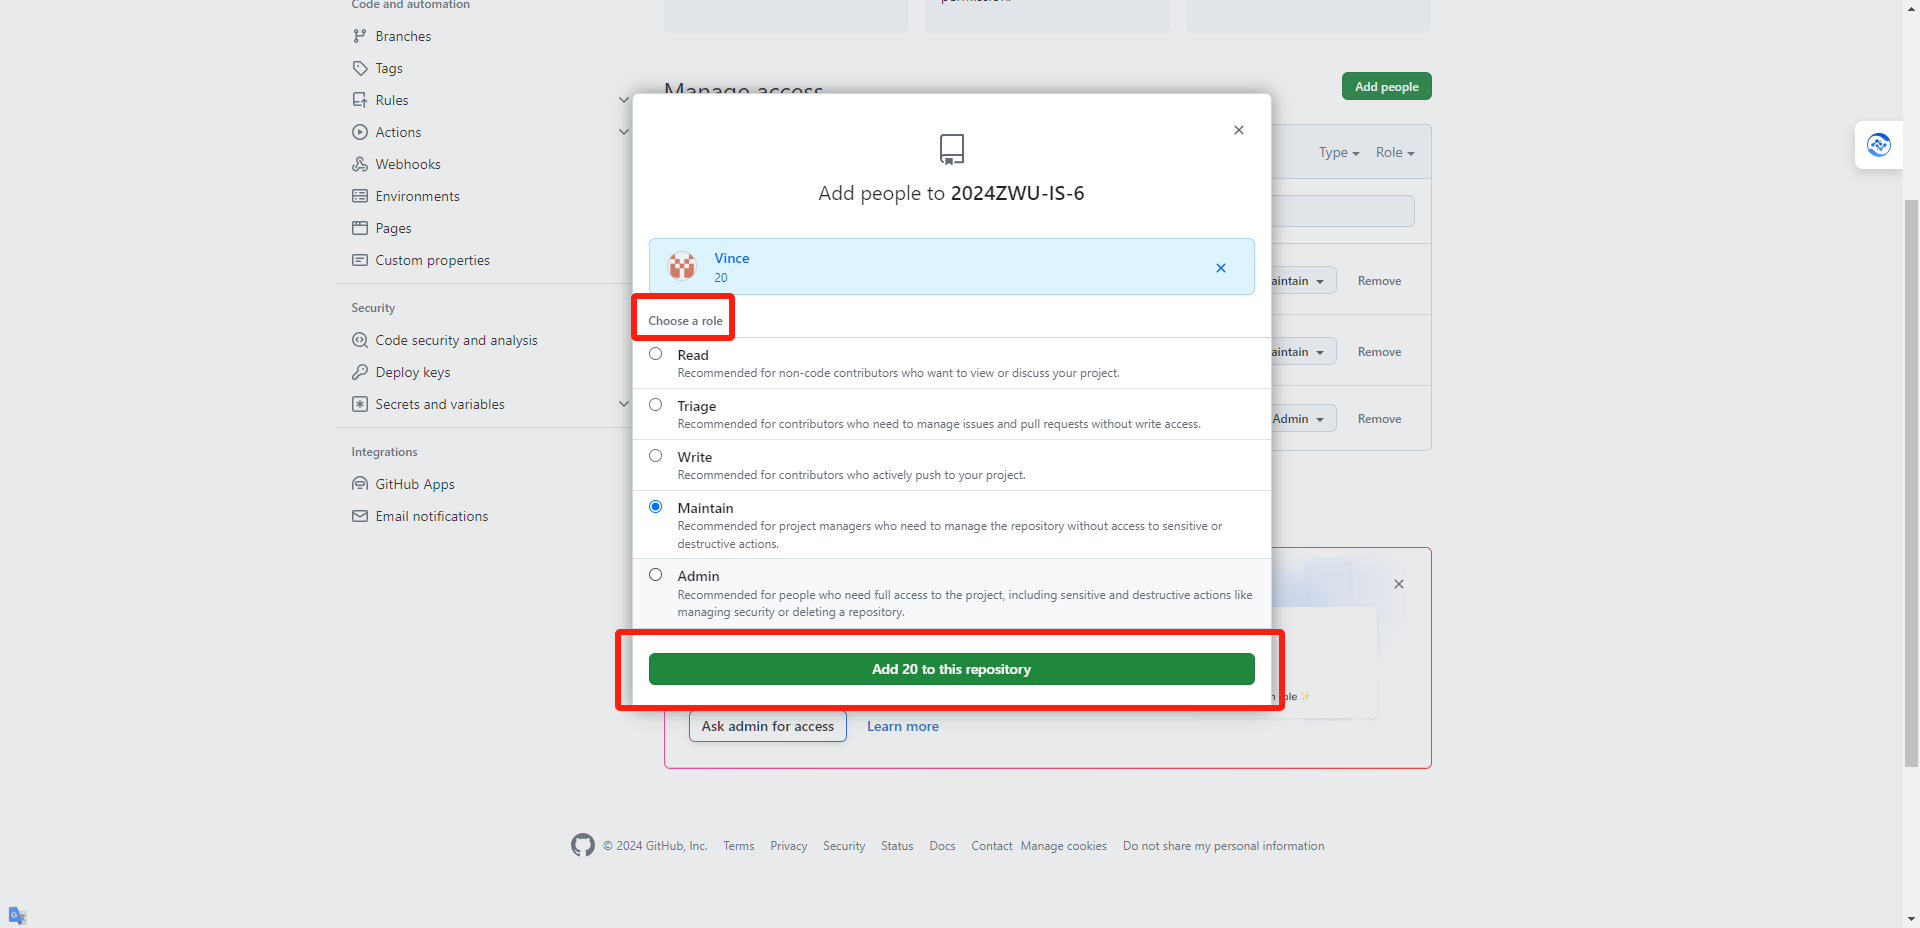
Now the member name is in the Collaborators and teams list. Roles could be change by the team requirements : Here the newly added member set a maintain role and another member as a write role.
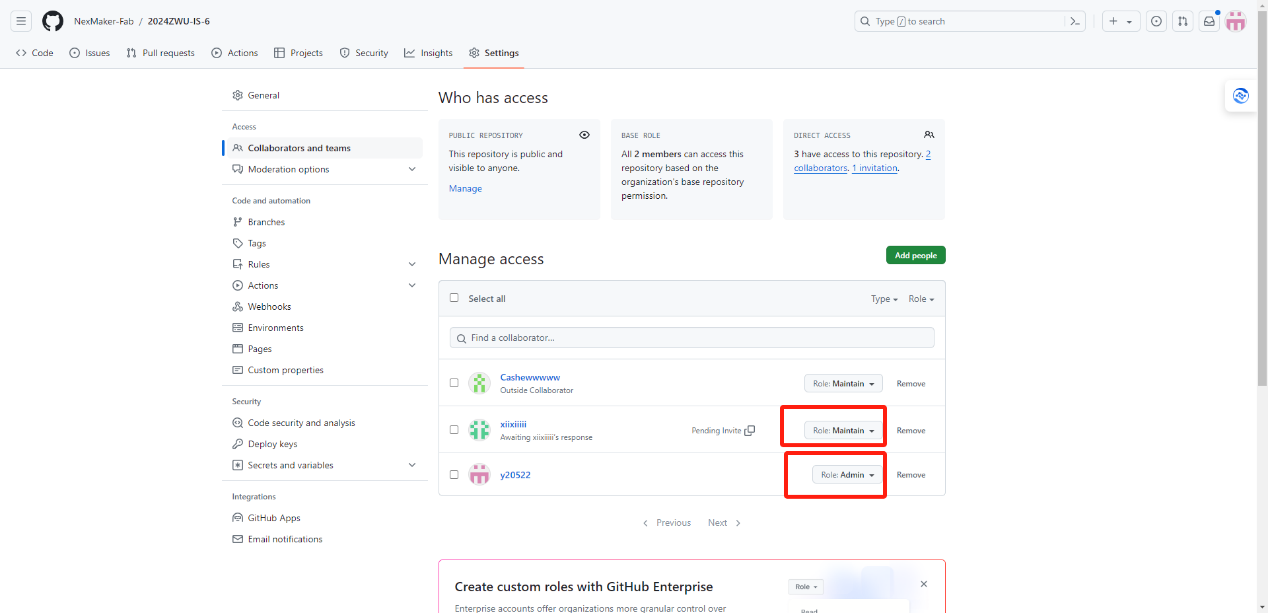
Like this way there 5 kinds of roles in github to maintain project : Read - This role allows the user to read and clone the repository. They can also initiate discussions and comments on issues and pull requests. Triage - The triage role encompasses the permissions of the Read role, along with the ability to manage issues and pull requests. Write - In addition to the privileges of the Triage role, users with Write access can also push changes to the repository. Maintain - Users with this level of permission can read, clone, and push changes to the repository. They can manage issues, pull requests, and certain settings of the repository. Admin - Admin users enjoy complete access, which includes all of the features of the Maintain role plus the power to manage the repository's settings and add collaborators.
STEP 3 :Publish the page from GitHub
Create a repository, or have an existing repository, click the setting > pages option.

Create an entry file for the site. GitHub Pages will find index.html, index.md or README.md files as entry files to the site. In the Github Pages page, you can choose which folder of which branch of the repository to publish to the Github page as the root directory of the website: finally click the Save button.
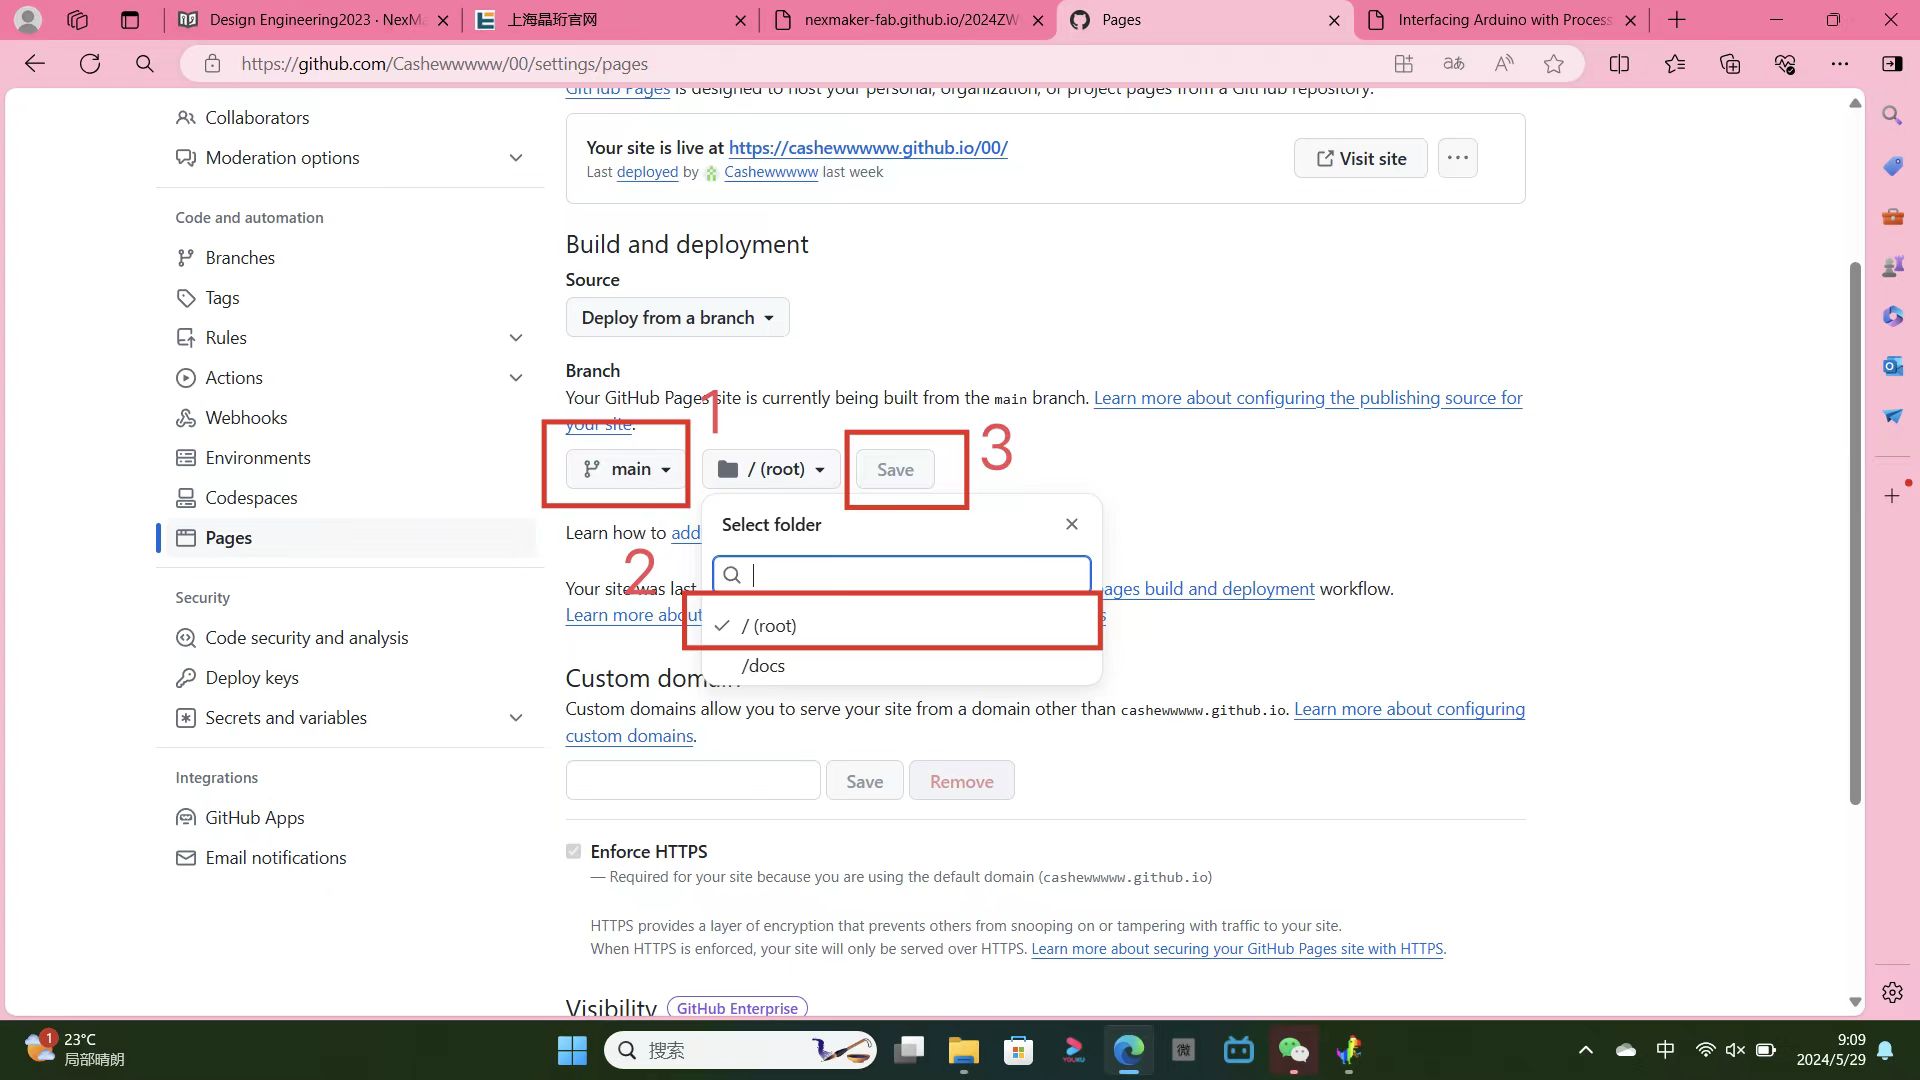
If the publishing source is a branch and a folder, the entry file must be located at the top of the source folder on the source branch. For example, if the release source is the /docs folder on the main branch, the entry file must be located in the /docs folder on the branch named main. If the release source is the GitHub Actions workflow, the deployed project must contain the entry file at the top of the project. You can choose to use GitHub Actions workflow to generate entry files when the workflow is running, instead of adding entry files to the repository.
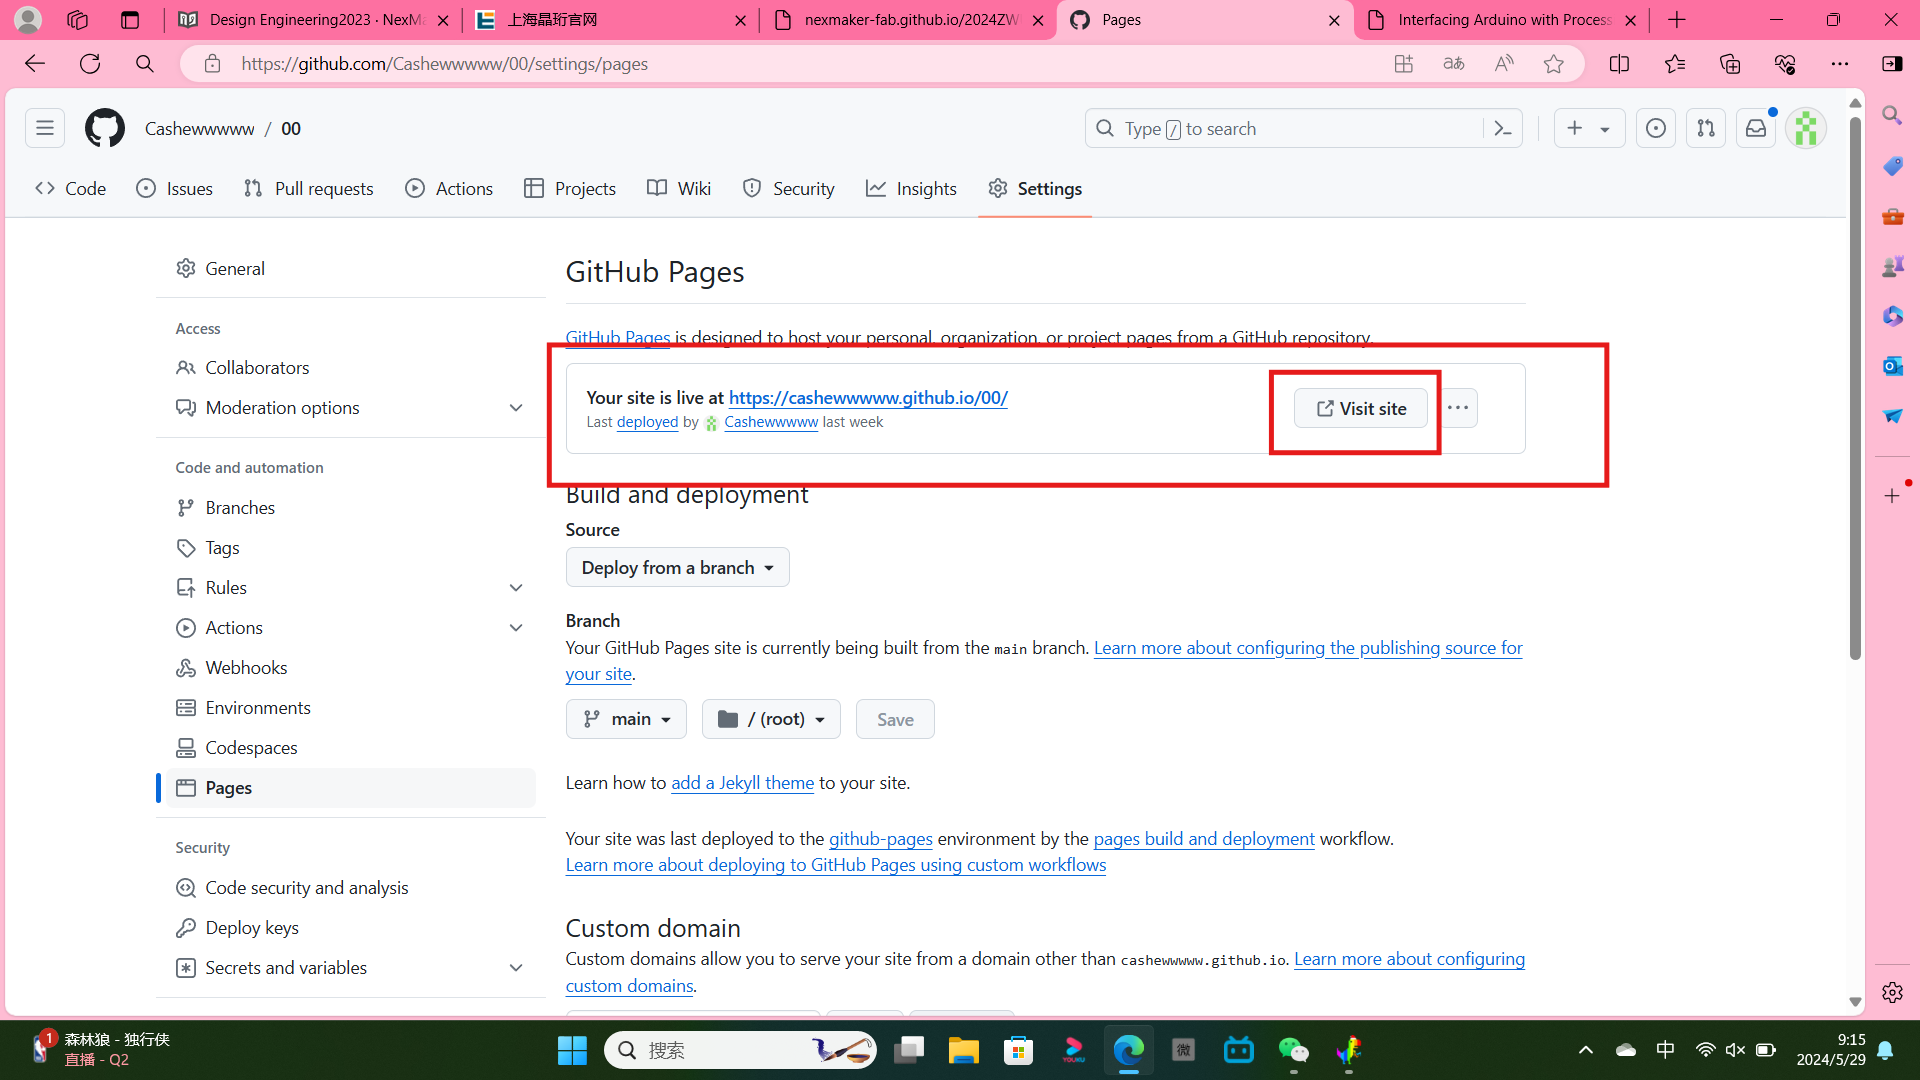
Then wait quietly for about 5 minutes, then refresh the page, and you can see a prompt to visit the website: then click Visit sate to visit your website:
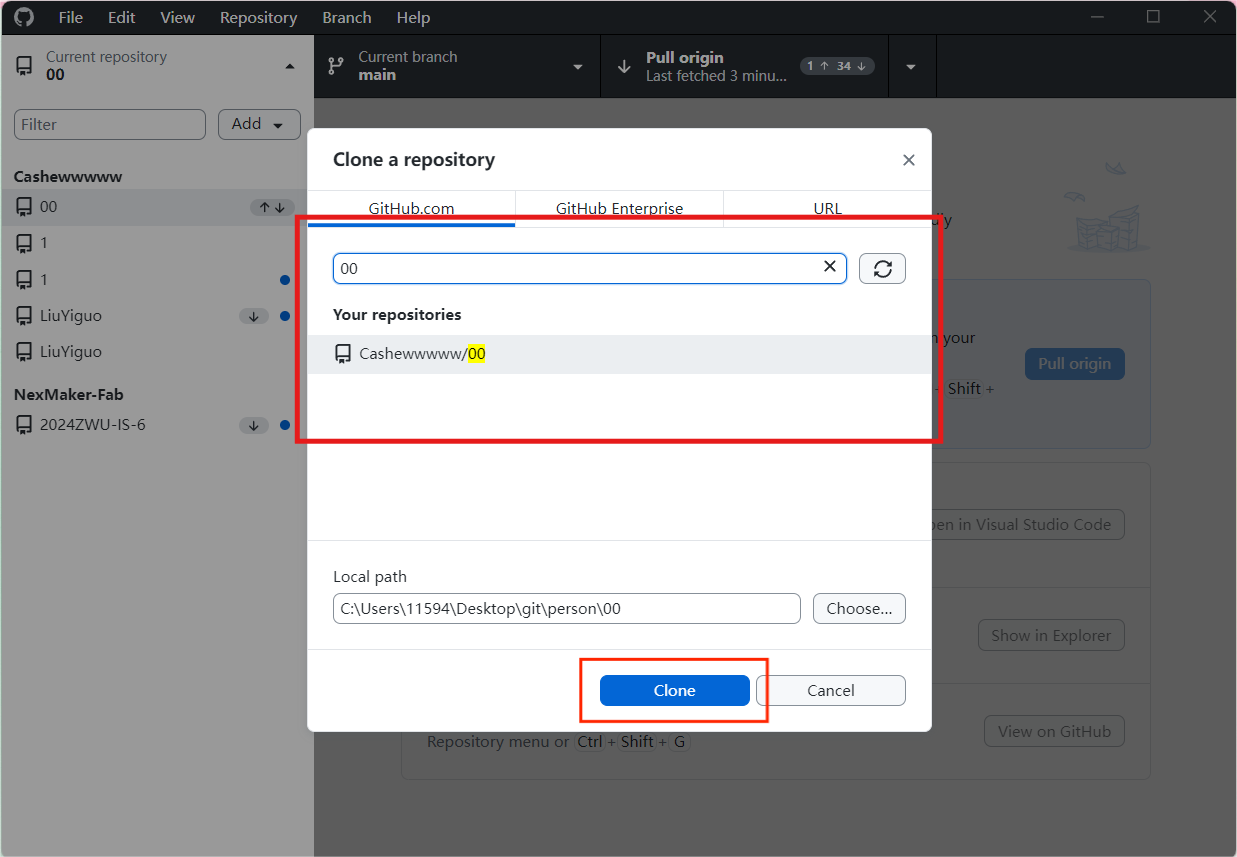
STEP 4 :Clone the repository into GitHub
To clone repoc, please open GitHub Desktop. Find the "Clone Repository" option, search for the repository created on the GitHub website, and then click "Clone".
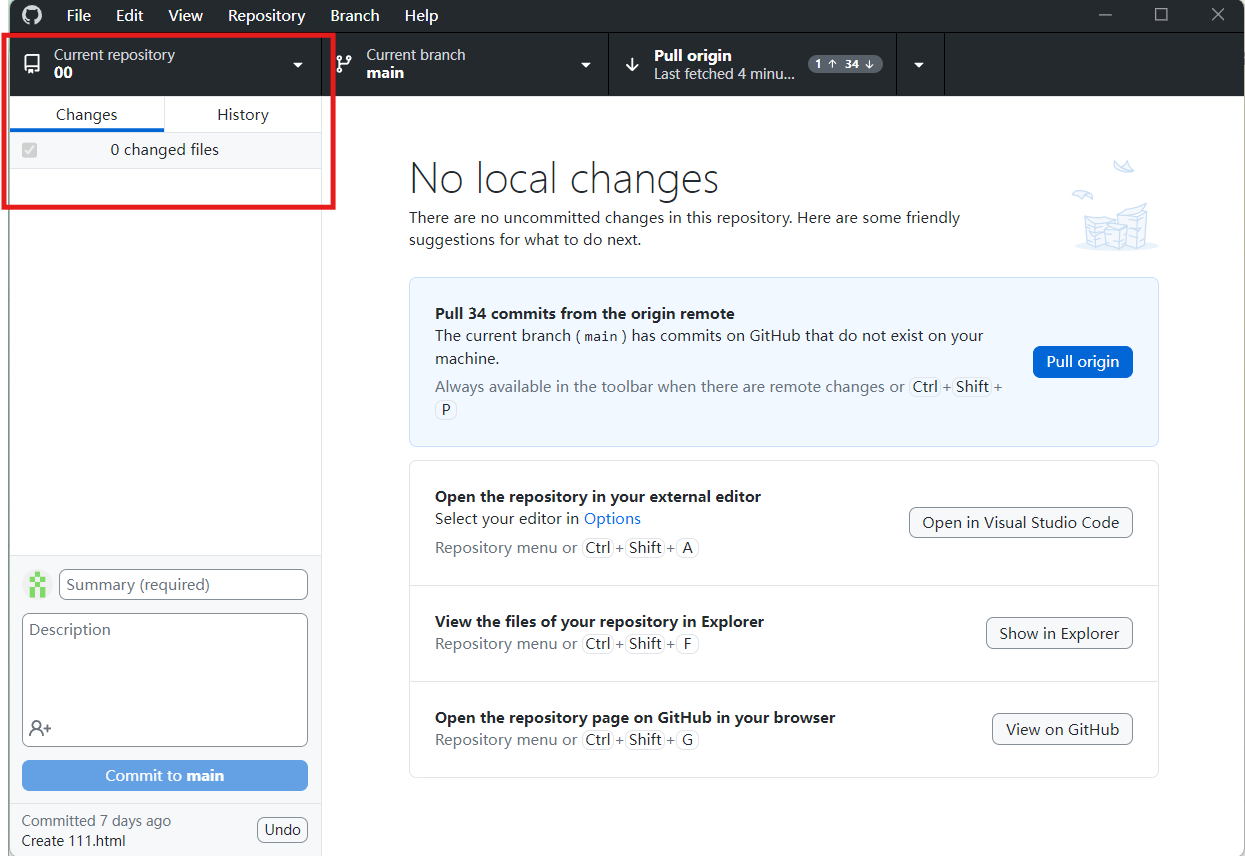
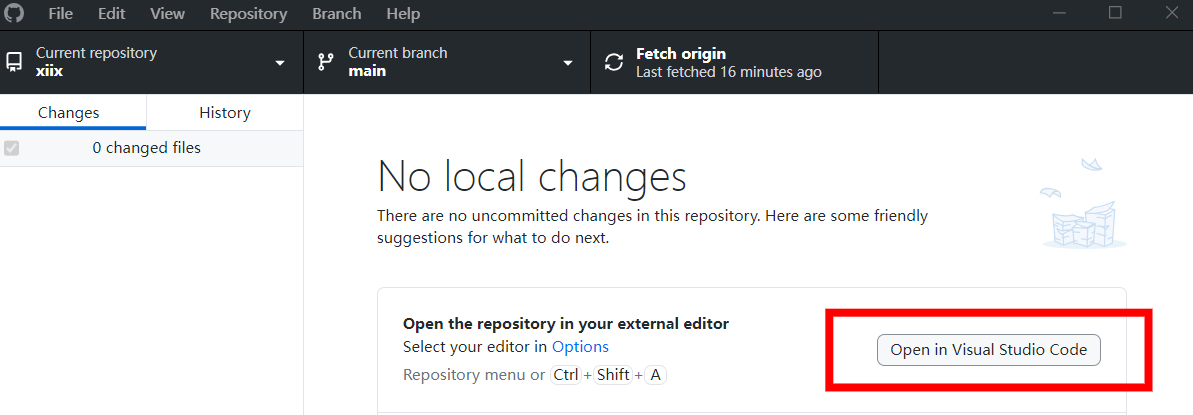
STEP 5 :Open the repository into Visual Studio Code
After cloning the repository to Visual Studio Code, click "Open in VS code" to open the repository in Visual Studio Code.
STEP 6 :Use pure HTML+CSS+JS mode to build
Step-7 Code writing
-Add navigation bar and side bar/Document writing We have provided guidance for the sidebar and navigation bar through code. This is index.xml, with attached image code, This includes adding images, hyperlinks, and CSS animations.:
    <!DOCTYPE html>
    <html>

    <head>
    <title>Final project</title>
    <link rel="stylesheet" type="text/css" href="style.css">!-- 链接外部CSS样式表,用于美化网页 --
    <link rel="preconnect" href="https://fonts.googleapis.com">!-- 提前与谷歌字体服务器建立连接,加快字体加载速度 --
    <link rel="preconnect" href="https://fonts.gstatic.com" crossorigin>
    <link href="https://fonts.googleapis.com/css2?family=Archivo+Black&display=swap" rel="stylesheet">!-- 从Google字体导入Archivo Black字体,用于网页中的文本显示 --
    </head>

    <body>
    <div class="background">!-- 最外层背景容器,设置网页背景样式 --
    <div class="group-74">
    <div class="header-01">
      <div class="bg2"></div>
      <div class="cta slide-in-anim-slow">!-- 带有缓慢滑入动画的调用操作按钮容器 --
        <a href="all p.html">See All Projects</a>!-- 一个链接,点击后跳转到介绍所有项目的页面 --
        <div class="shapes">
          <img
            class="ico-24-arrows-arrow-forward"
            src="https://cdn.jsdelivr.net/gh/y20522/image-cloud/img/2586b18d1ef0d3852649923177fba185b0a1d5205f11-vsVZ0y_fw1200.png">!-- 添加向左的按钮icon图片 --
        </div>
      </div>

      <div class="we-are-some-digital-storytellar slide-in-anim">!-- 带有滑入动画的介绍文字容器 --
        We Are
        <br />
        NONE GROUP
      </div>
    </div>
    <div class="nav-01">
      <div class="hire-us">
        <div class="hire-us2 regular-text slide-in-anim-slowow">!-- 内部的导航项,带有滑入动画,用于链接到“关于我们”的页面 --
        <a href="About us.html">About us</a>
      </div>
      <div class="company-name slide-in-anim-slowow">
        <div class="kraft-8 regular-text">MENU</div>!-- 显示“菜单”字样,是可点击元素用于展开或关闭导航菜单 --
      </div>
    </div>
    </div>
    </div>


      <!-- 侧边菜单 -->
      <div class="slide-menu" id="menu"
           onmouseover="keepMenuOpen(true)"
           onmouseout="keepMenuOpen(false)">
        <a href="index.html">Home</a>
        <a href="About us.html">About us</a>
        <a href="see all p.html">All our projects</a>
        <a href="project management.html">Project management</a>
        <a href="kaiyuan.html">Open-source hardware and Arduino</a>
      </div>


    <div class="fadeWrapper">!-- 用于包裹需要淡入淡出效果的元素的容器 --
    <div class="marquee">
    <img src="https://cdn.jsdelivr.net/gh/y20522/image-cloud/img/2.png" alt="your image">!-- 滚动条中的图像,会重复出现以创建持续的滚动视觉效果 !!!!  --
    <img src="https://cdn.jsdelivr.net/gh/y20522/image-cloud/img/2.png" alt="your image">
    </div>
    </div>
    </div>
    <script>
    const mousePointer = document.createElement('div');-- 创建一个新的div元素用于自定义鼠标指针 --
    mousePointer.className = 'mouse-pointer';-- 给新创建的div元素添加类名 --
    document.body.appendChild(mousePointer);-- 将该div元素添加到body中,确保能在整个页面中显示 --

    window.addEventListener('mousemove', function (e) { !-- 监听鼠标移动事件 --
    mousePointer.style.left = `${e.pageX}px`; !-- 根据鼠标位置更新自定义指针的left值 --
    mousePointer.style.top = `${e.pageY}px`; !-- 根据鼠标位置更新自定义指针的top值 --
    });

    const links = document.querySelectorAll('a');  !-- 选择页面上所有的元素 --

    links.forEach(link => { !-- 为每个链接添加事件监听 --
    link.addEventListener('mouseenter', () => { -- 当鼠标进入链接时 --
      mousePointer.classList.add('large'); -- 自定义鼠标指针变大 --
    });
    link.addEventListener('mouseleave', () => { -- 当鼠标离开链接时 --
      mousePointer.classList.remove('large'); -- 自定义鼠标指针恢复原状 -
    });
    });

    window.onload = function() { -- 当页面加载完成后执行 --
    const images = document.querySelectorAll('.marquee img'); -- 选择所有滚动图像 --
    let loadedImages = 0; -- 计数器,用于跟踪已加载的图像数量 --

    images.forEach((img) => { -- 为每个图像设置onload事件 --
    img.onload = function() { -- 当图像加载完成时 --
      loadedImages++; -- 增加计数器 --

      if (loadedImages == images.length) { -- 如果所有图像都已加载 --
        let marquee = document.querySelector('.marquee'); -- 选取滚动视图容器 --
        marquee.style.opacity = 1; -- 将其不透明度设置为1,使其完全可见 --
        marquee.classList.add('startAnimation'); -- 添加动画开始的类 --
      }
    };
    img.src = img.src; -- 重新设置src以触发onload事件,确保图像加载 --
    });
    };

    </script>

    </body>

    </html>
-Add image We follow the website posted by the teacher step by step
The function of Image upload service is to storage your picture or video on cloud and then you can use the link in your markdown document.Then Image upload service will export one link for your information(it would used in markdown document).The following show one method using PicGo and gitlab to build.
1.Download PicGo application from github and install it. 2.Open PicGo and setting the software.Now we need open gitlab to get some information(obvious we have some other choice to storage our information ,for example Github ,Aliyun OSS ,Imgur,etc), 3.url: gitlab url (eg:https://gitlab.com) 4.group: gitlab project's group name 5.project: gitlab project name 6.token: gitlab's api token (Setting /Access Token/Click ) 7.OK ,update picture to gitlab 8.method1: right click and choice update picture with picgo 9.method2:push picture to picgo
Use VScode to write html language
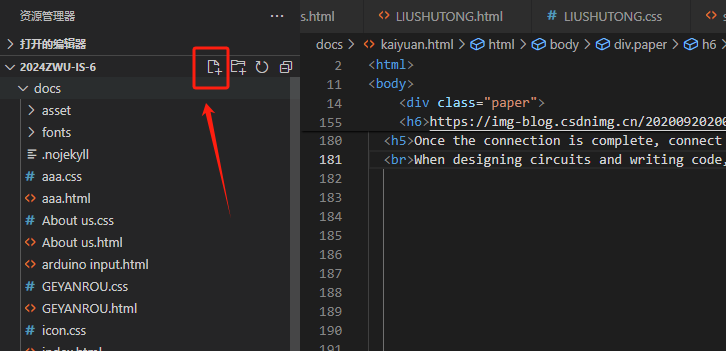
Create a new.html file to write
how to make the daily homework page
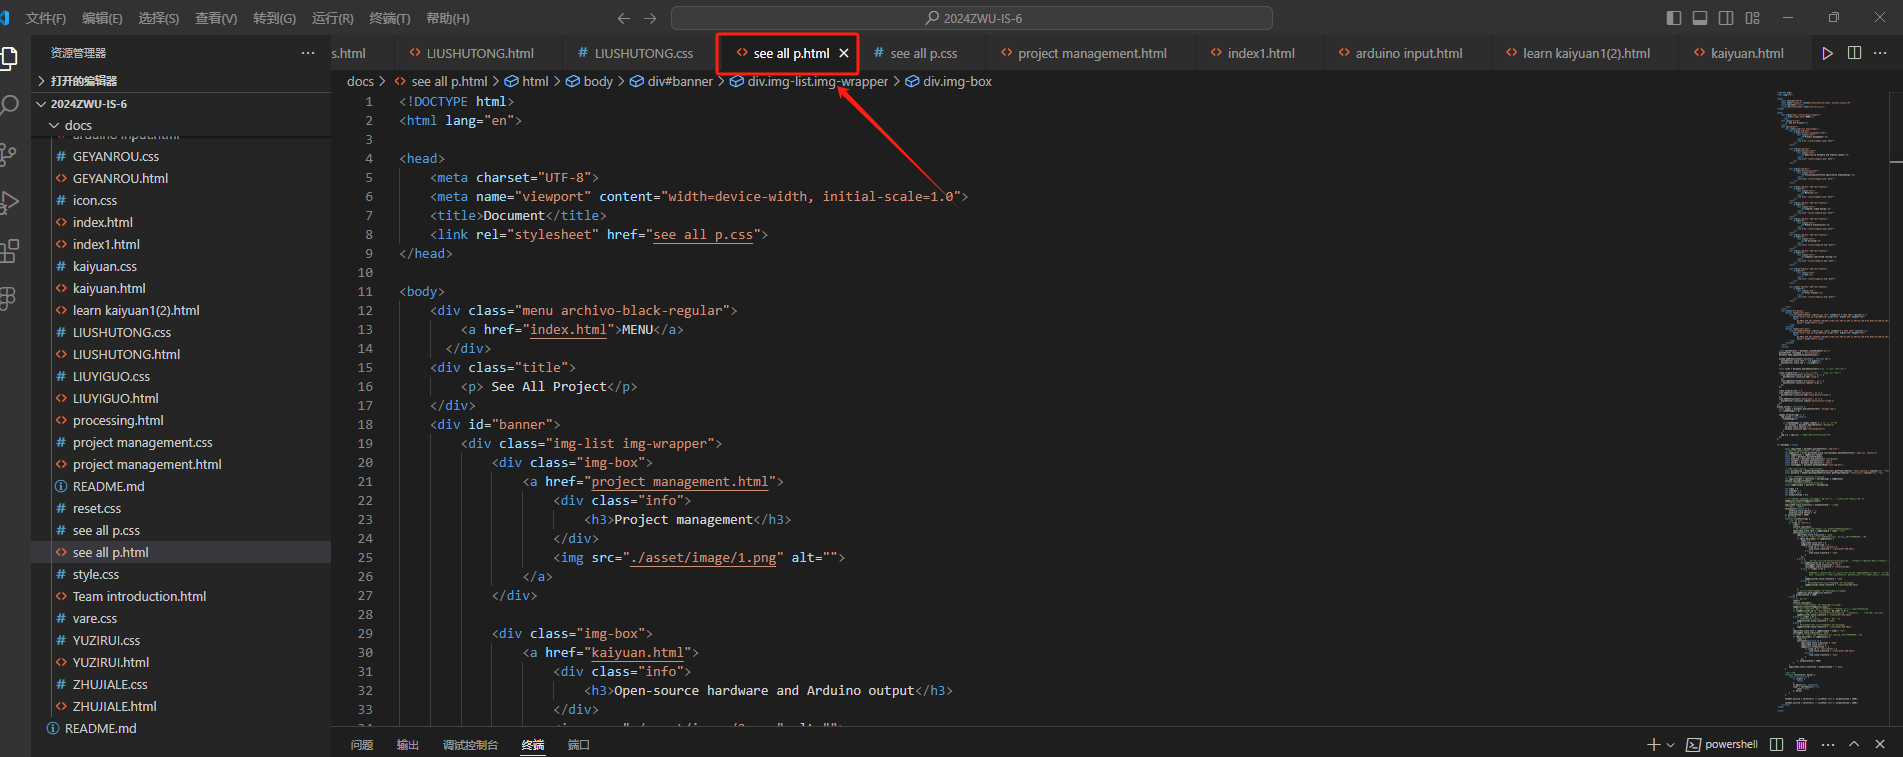
First I created an html page called See all projects to use as a navigation for all my homework
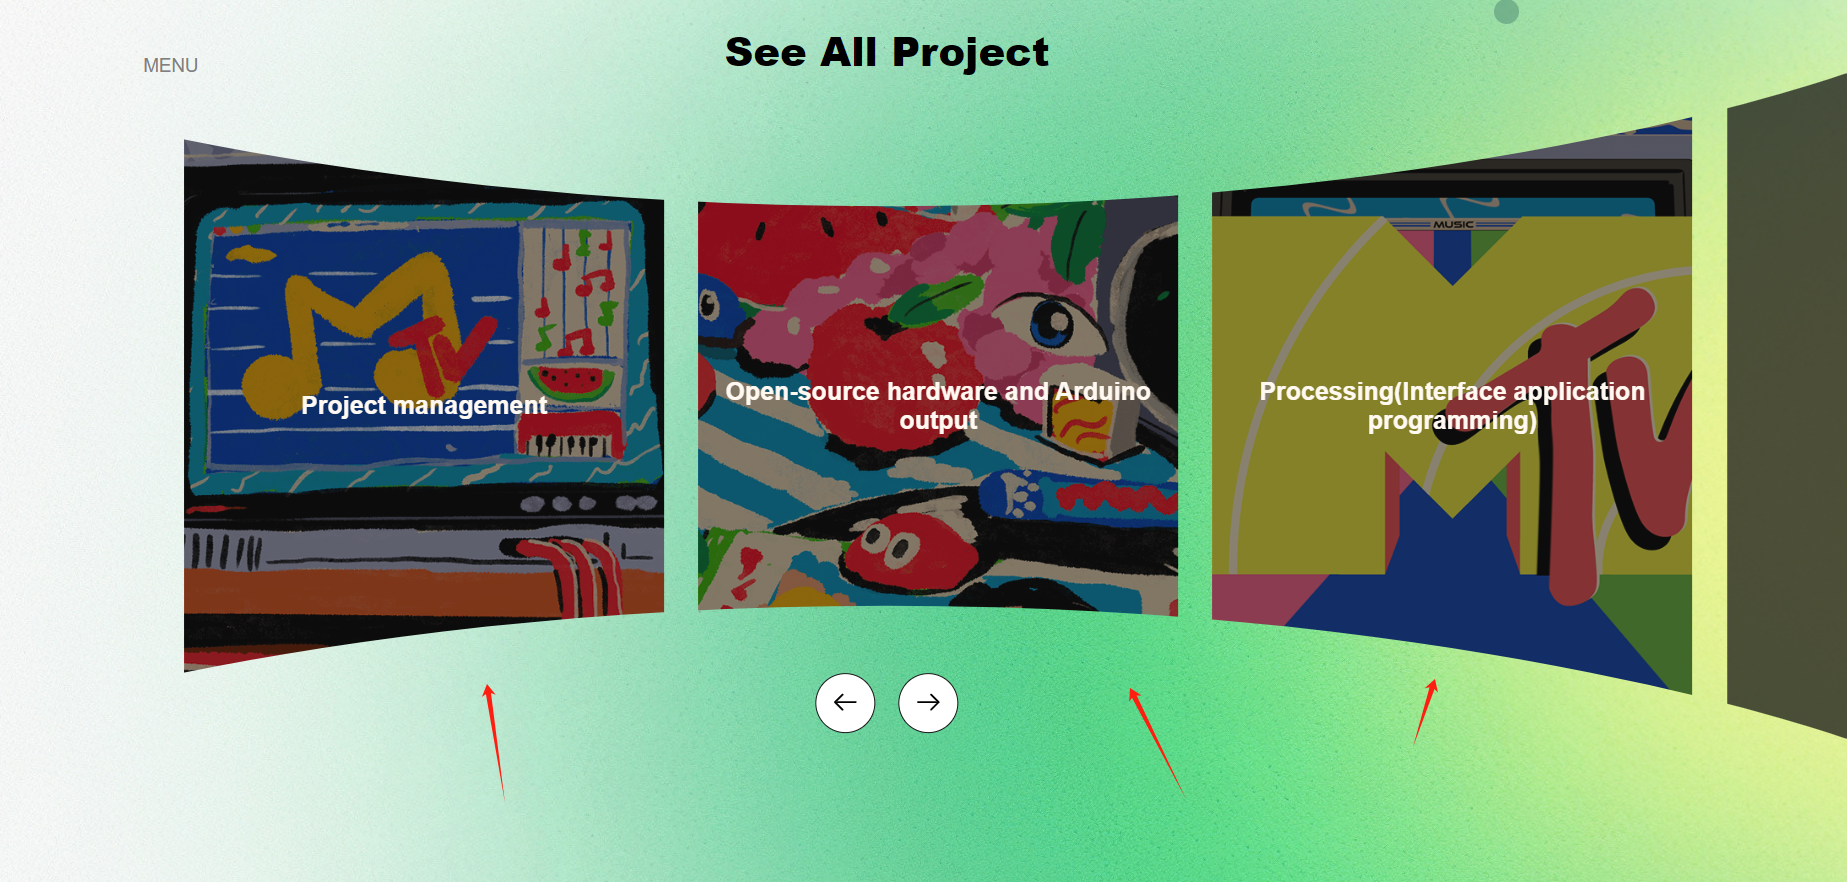
And we used the image carousel css style to visualize our homework project
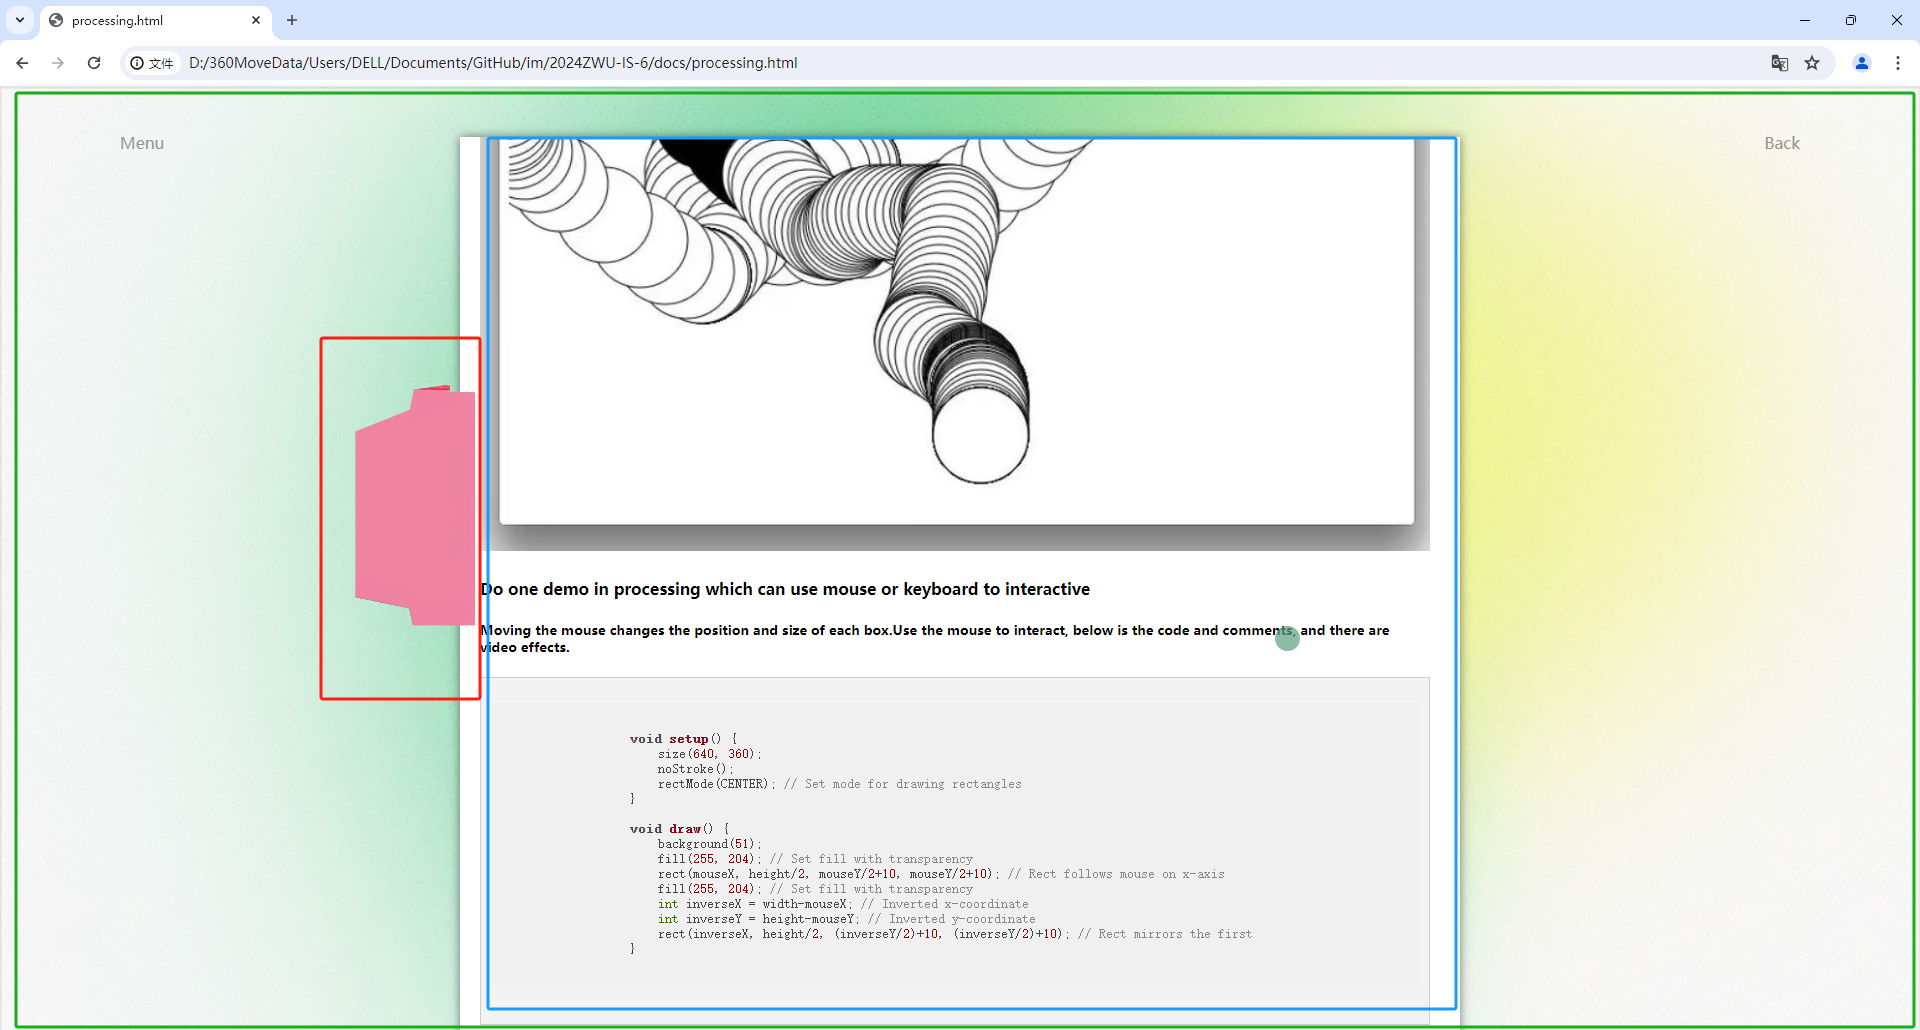
A basic homework frame consists of three parts, a background, a frame the size of A4 paper and a pink clip, and the same template will be used for different homework assignments
    <!-- 纸框架区域开始 -->
    <div class="paper">
        <div class="text">
            <!-- 在这里开始放置页面的内容 -->

            <!-- 以下是各个步骤标题和详细说明 -->
            <h1>How to create a website?</h1>
                <h3>Steps of building</h3>
                <h4>  STEP-1 : Installing all the necessary tools.</h4>
                <p>   STEP-2 : Open repository into GitHub.</p>
                <!-- 余下的步骤继续放在此处 -->

            <!-- 还包括一些有关工具的信息和链接 -->
            <h3>STEP 1 : Installing necessary Tools</h3>
            <p>We installed all the following tools to build the website...</p>
            <!-- 如Git,GitHub,还有更多的介绍和图片 -->
            <!-- ... -->

            <!-- 整个纸框架的内容继续下去 -->

        </div>
    </div>
    <!-- 纸框架区域结束 -->

    <!-- 页面其他部分继续在这里编写,比如添加脚注、footer等 -->
This is A4 paper style html writing, with this framework after only need to fill in the information to complete the homework each time
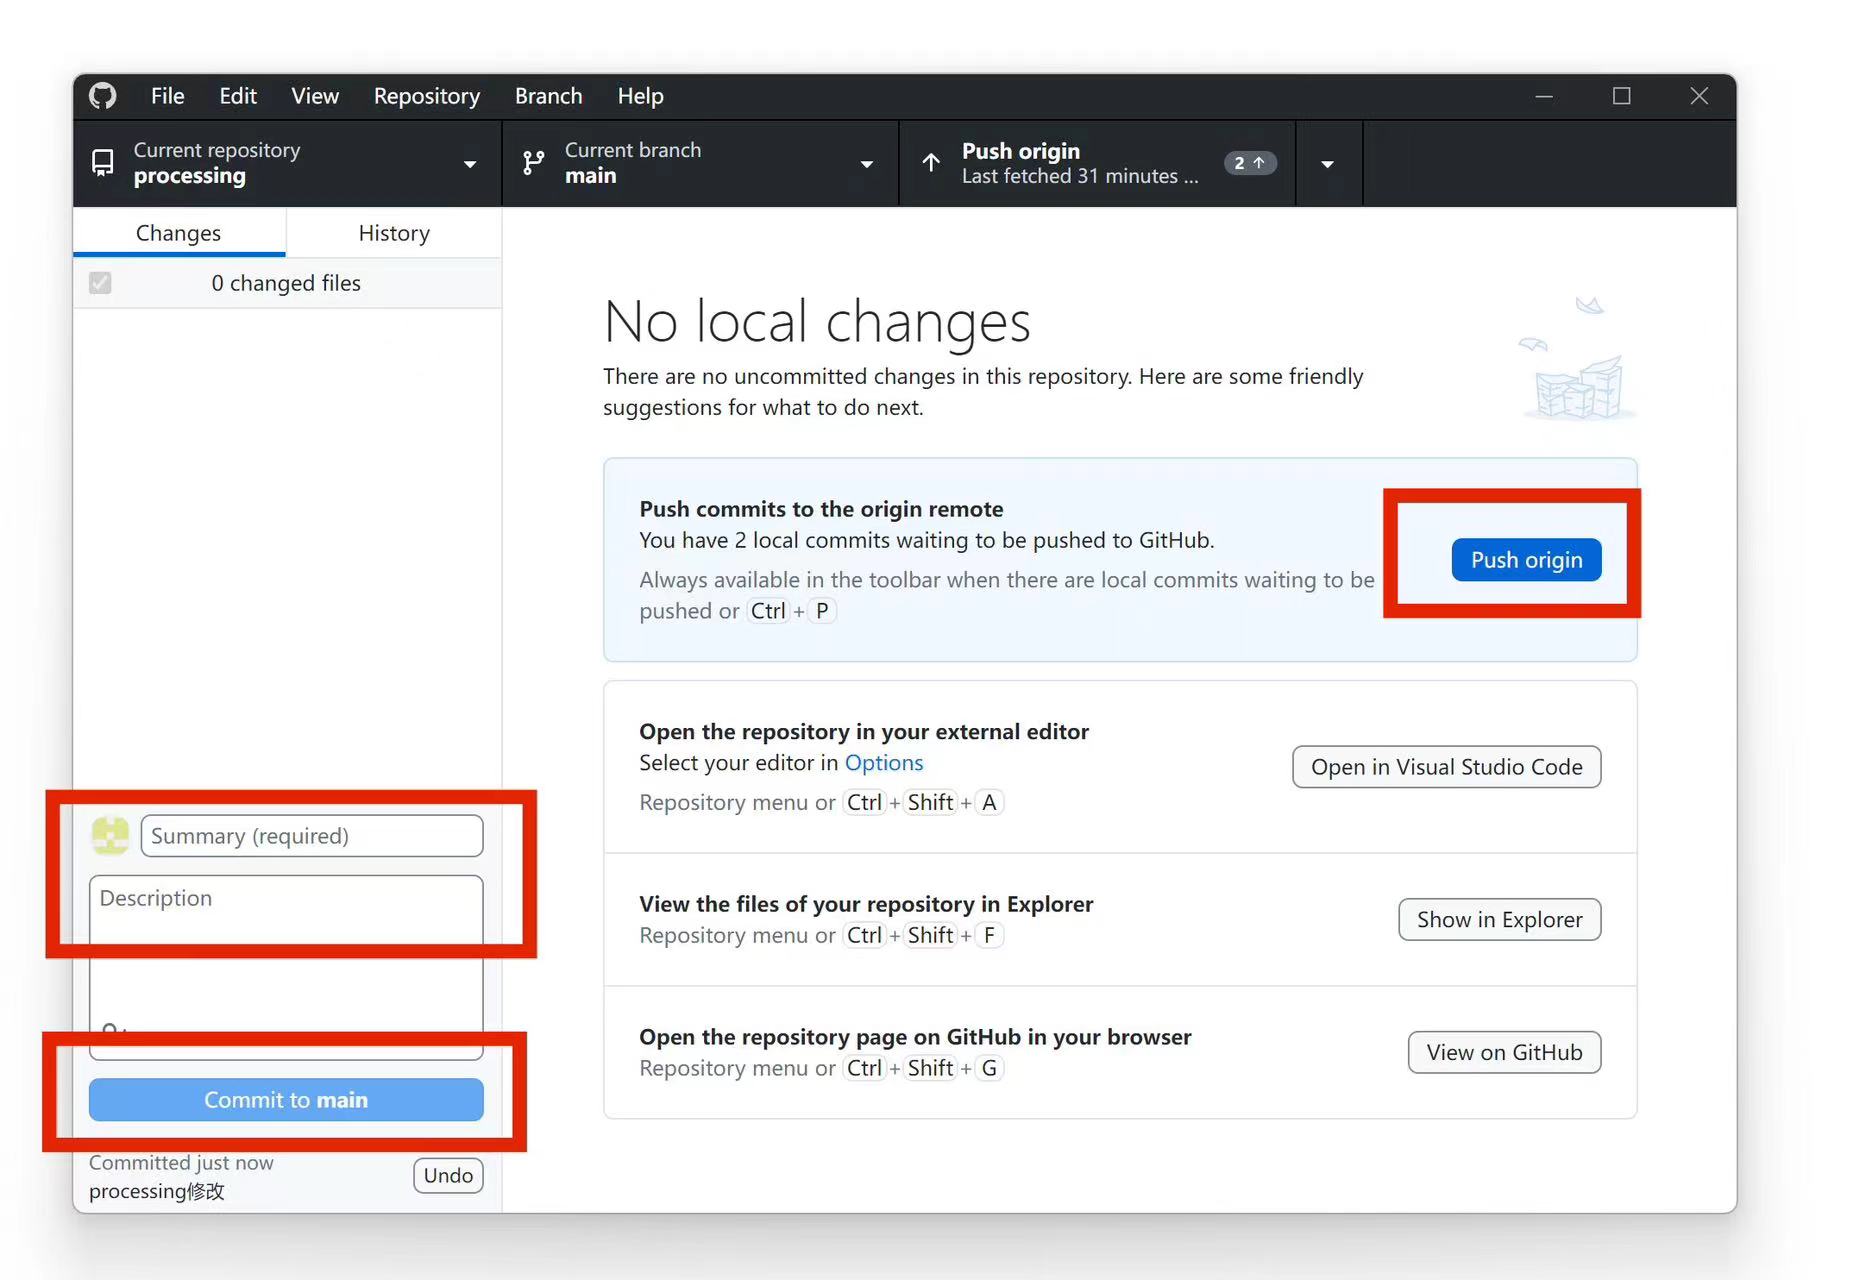
Push all the changes into origin
Use github desktop to upload new information change the branch's fold from root to new fold.
On the github screen, select settings, then pages on the left, select main for branch, then root next to branch, and save.
A basic homework frame consists of three parts, a background, a frame the size of A4 paper and a pink clip, and the same template will be used for different homework assignments
<!-- 纸框架区域开始 -->
<div class="paper">
<div class="text">
<!-- 在这里开始放置页面的内容 -->
<!-- 以下是各个步骤标题和详细说明 -->
<h1>How to create a website?</h1>
<h3>Steps of building</h3>
<h4> STEP-1 : Installing all the necessary tools.</h4>
<p> STEP-2 : Open repository into GitHub.</p>
<!-- 余下的步骤继续放在此处 -->
<!-- 还包括一些有关工具的信息和链接 -->
<h3>STEP 1 : Installing necessary Tools</h3>
<p>We installed all the following tools to build the website...</p>
<!-- 如Git,GitHub,还有更多的介绍和图片 -->
<!-- ... -->
<!-- 整个纸框架的内容继续下去 -->
</div>
</div>
<!-- 纸框架区域结束 -->
<!-- 页面其他部分继续在这里编写,比如添加脚注、footer等 -->
This is A4 paper style html writing, with this framework after only need to fill in the information to complete the homework each time
Push all the changes into origin
Use github desktop to upload new information change the branch's fold from root to new fold.
On the github screen, select settings, then pages on the left, select main for branch, then root next to branch, and save.